When you try to add a duplicate page rule for the same target URL and domain, Cloudflare will ignore those API requests as shown in the demonstration.
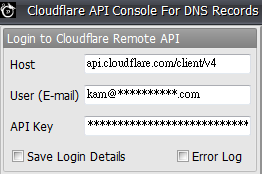
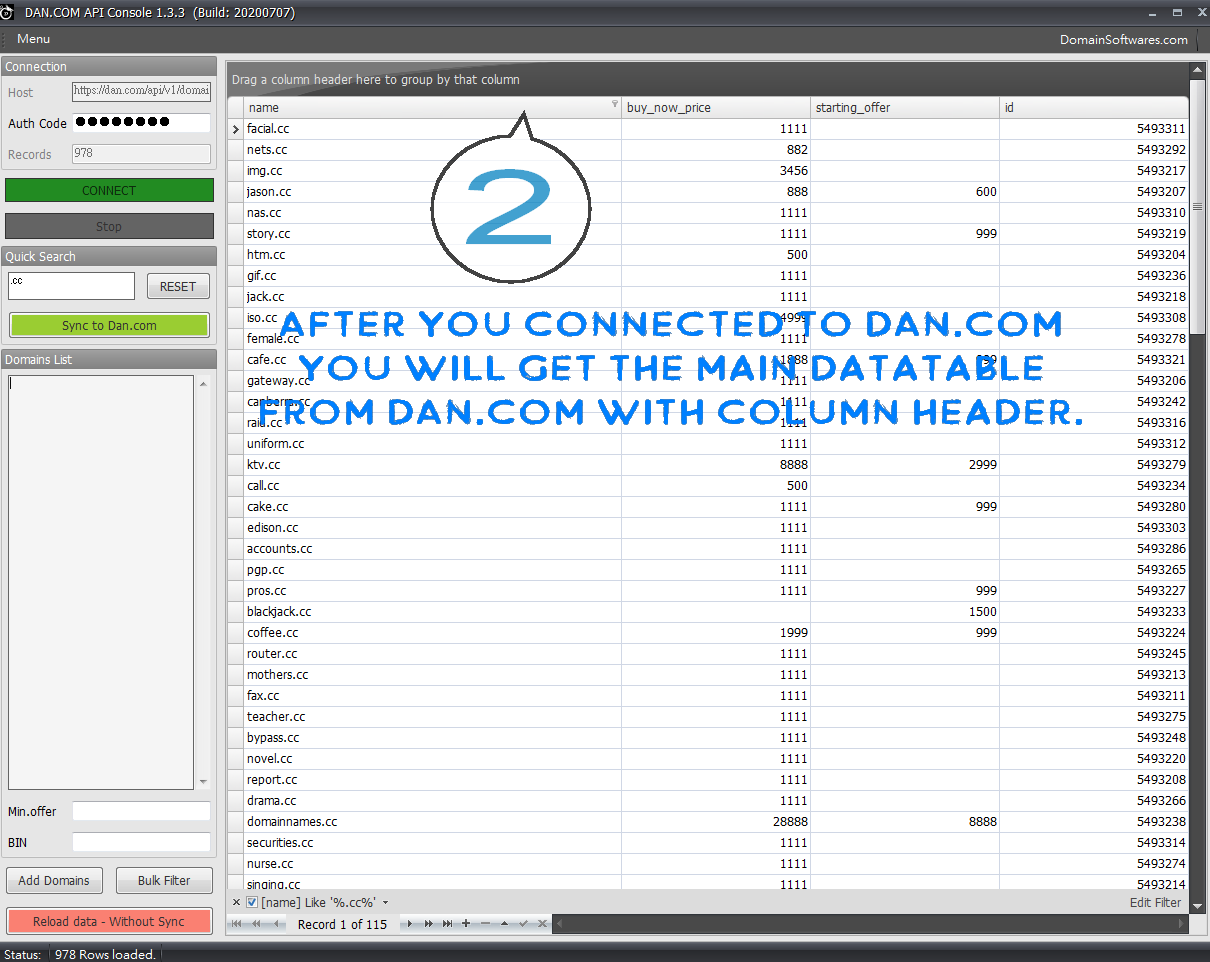
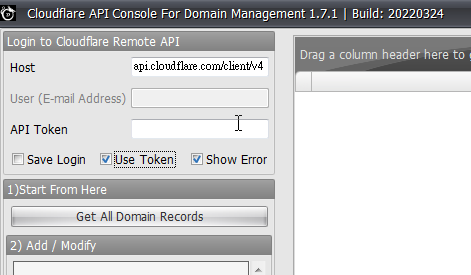
1) Fill in the username and APIkey
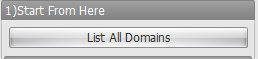
2) Then, click the List All Domains Button.
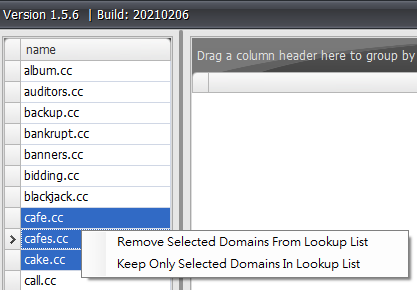
3) Now, You have a chance to remove some of the domains from the lookup list that you are not intend to change.
It will be very useful when you have 1000+ domain and you just want to modify 20 of them. You may only want to load 20 of them into cache instead of loading all of them into cache.
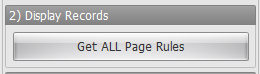
4) Click Get All Page Rules to get all records listed in the lookup list.
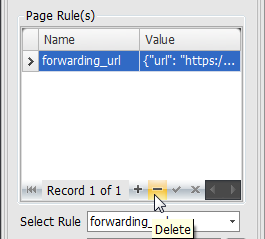
5) After that, you can start to use below section to Add New PageRules or delete Pagerules.
Above method is not a recommended method, we have a better way to do it and we will explain it soon.
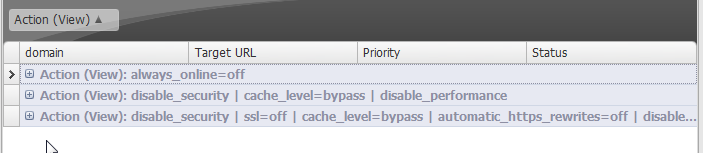
In the web interface, every time you selected certain rule, another rule may be grey out to avoid conflict,
Since our software don’t check for page rules conflicts. It’s recommended to use the web interface to create your first set of rule , in order to ensure that no conflict rules are selected together.
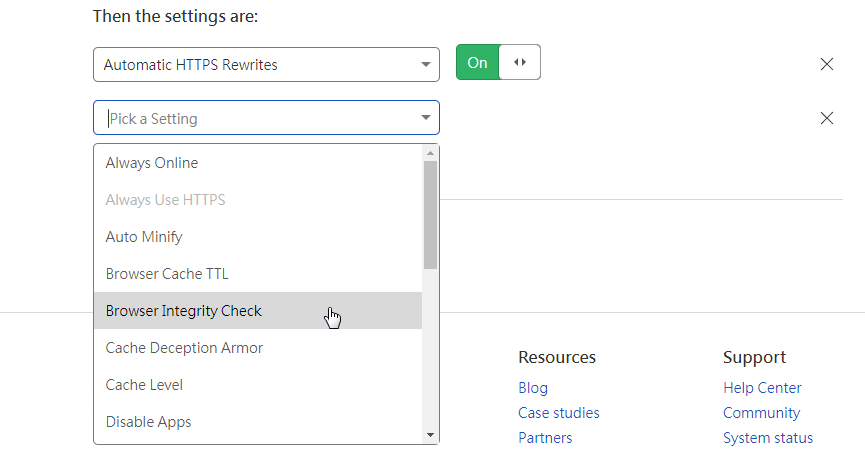
In the following example, we have 500+ domains and we want add rules for them to make the let’s encrypt verification go through.
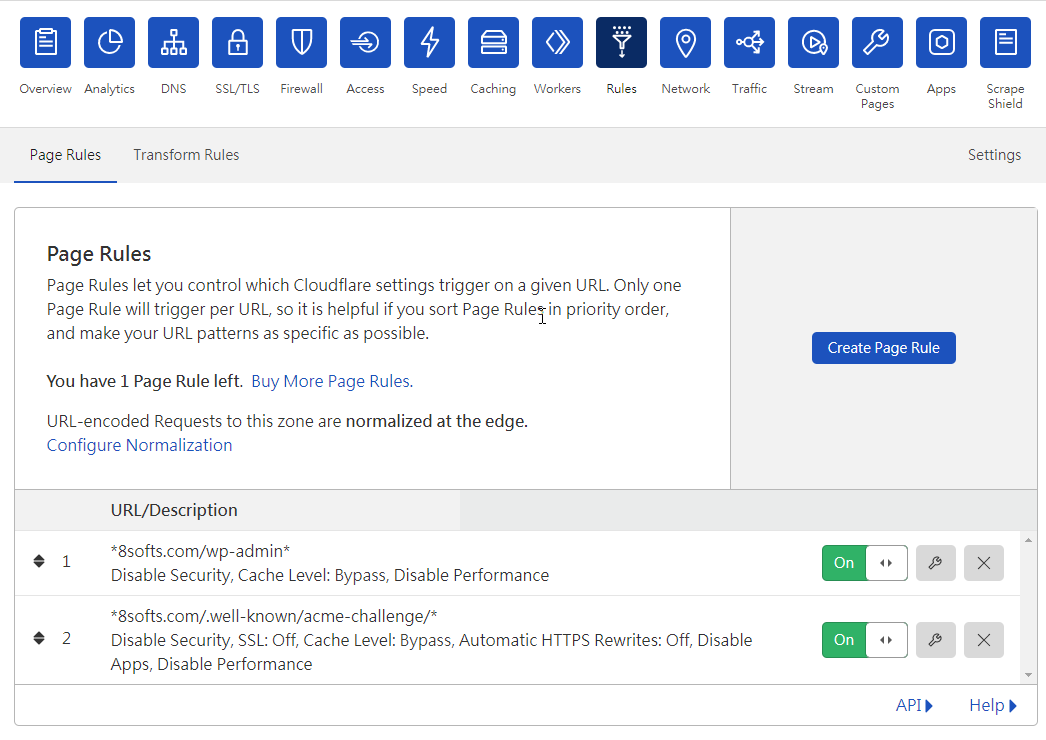
We already added the rule via the web interface and now we’re going to apply the same set of rules to another 500+ domains.
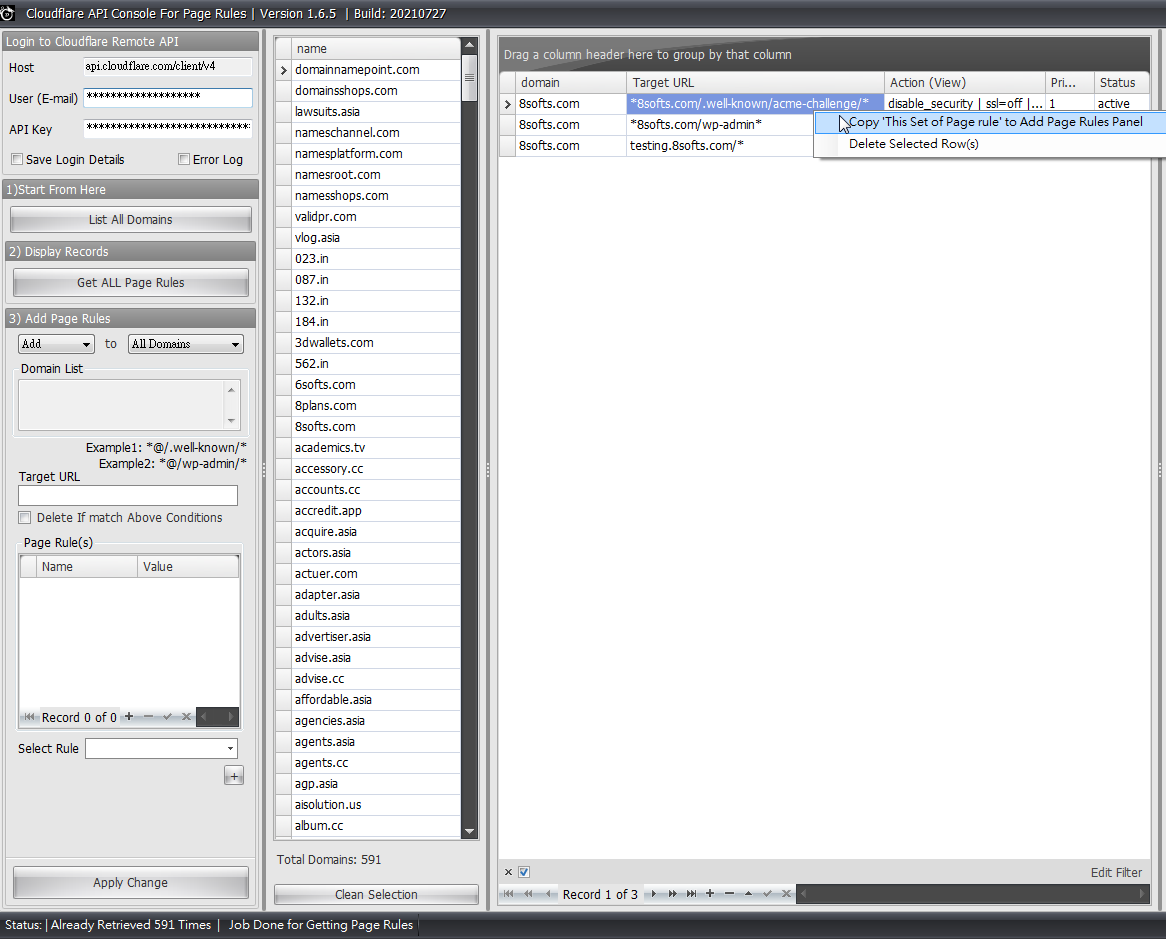
Click the Copy ‘This set of Page rule’
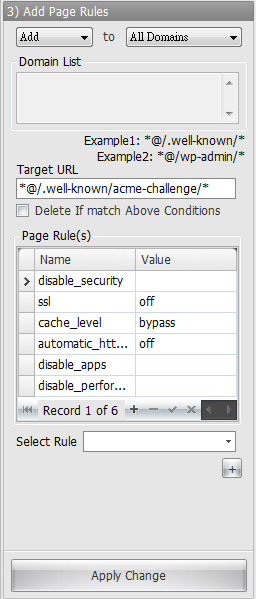
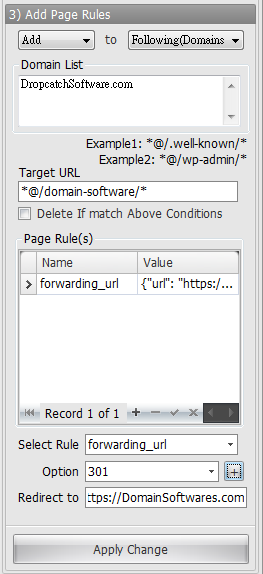
The page rules is now copied into left panel’s Add Page Rules section,
Then, fill in the Target URL,
Tips: Please make sure that using @ instead of full domain names.
Finally, click apply change
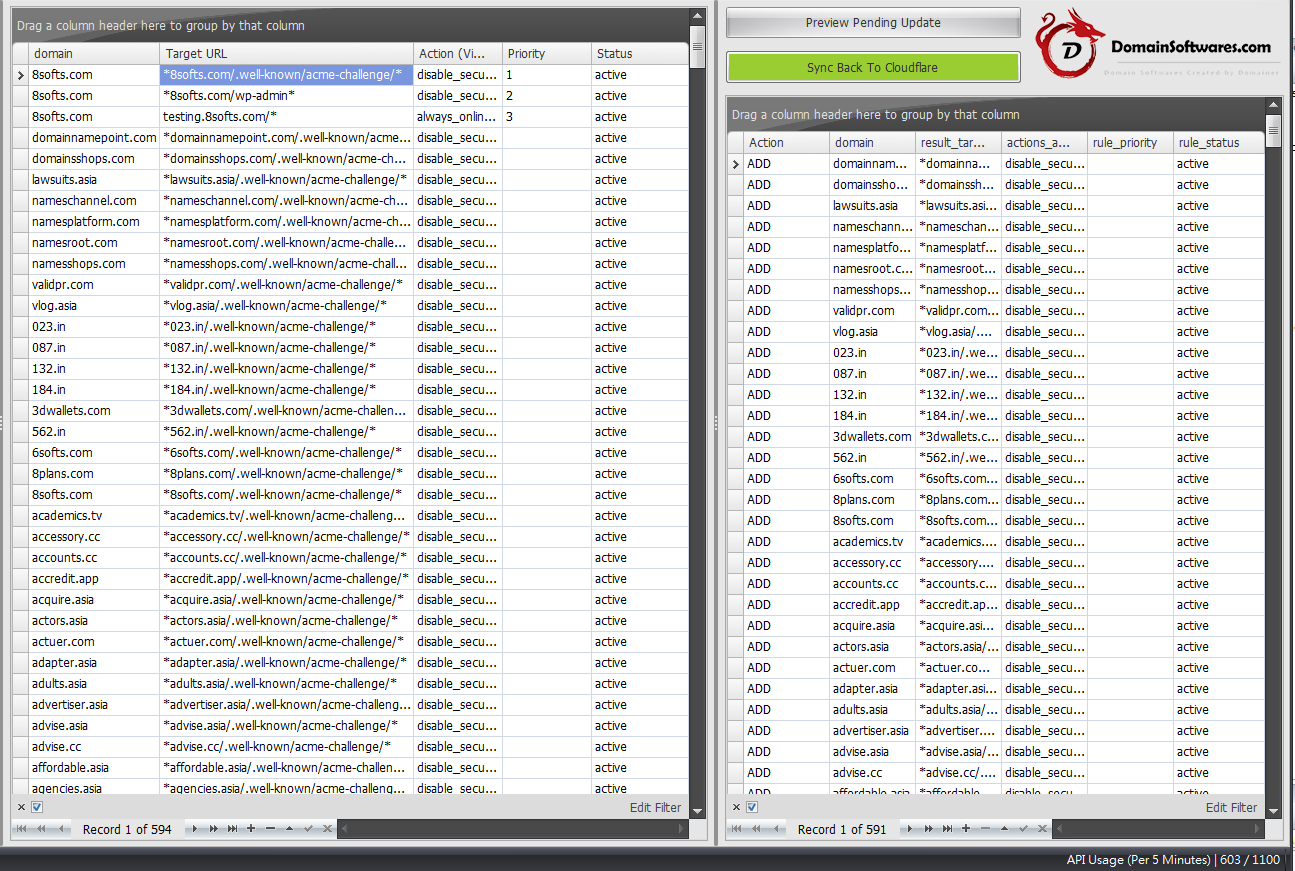
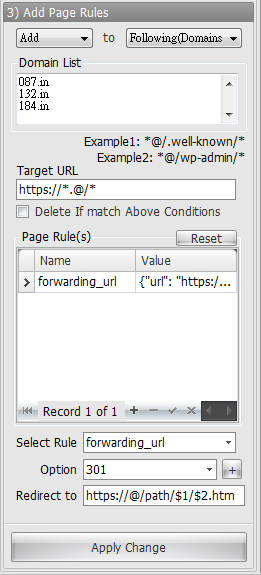
Now, 500+ page rules has been automatically generated in cache. The `@` is automatically replaced with full domains.
If everything looks good for you, click Sync back to Cloudflare to start to send the API requests and apply the change.
If you found that you mess up somethings and don’t want to submit the changes, you can click “Get All Page Rules” to startover.
With this software, you can managed 1000+ domains Page Rules using Cloudflare with ease.
Demonstration
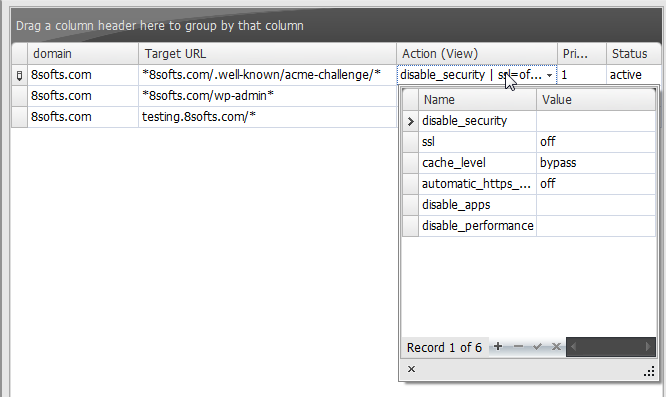
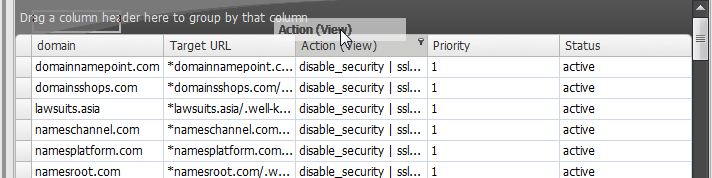
Double click to view Cloudflare’s page rule details
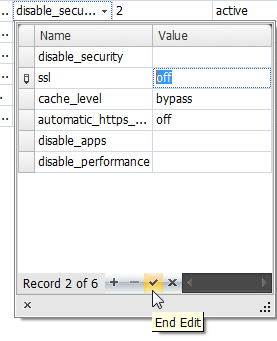
The setting value can be change in the popup. Please make sure you have press the `End Edit` button after you made a change.
Manual change is not what we recommended for new user, because any typo mistake will lead to update failure and those API update request will be ignored.
We recommended new user to build the page rule with the web interface and then clone the same set of rules on other domains as needed.
The column width can be adjust, in order to view the page rules in single line.
3) Now, You have a chance to remove some of the domains from the lookup list that you are not intend to change.
It will be very useful when you have 1000+ domain and you just want to modify 20 of them. You may only want to load 20 of them into cache instead of loading all of them into cache.
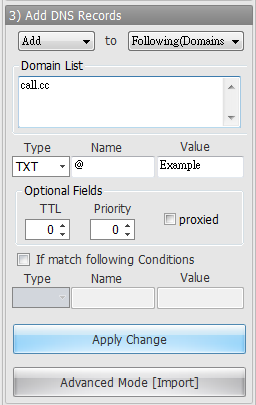
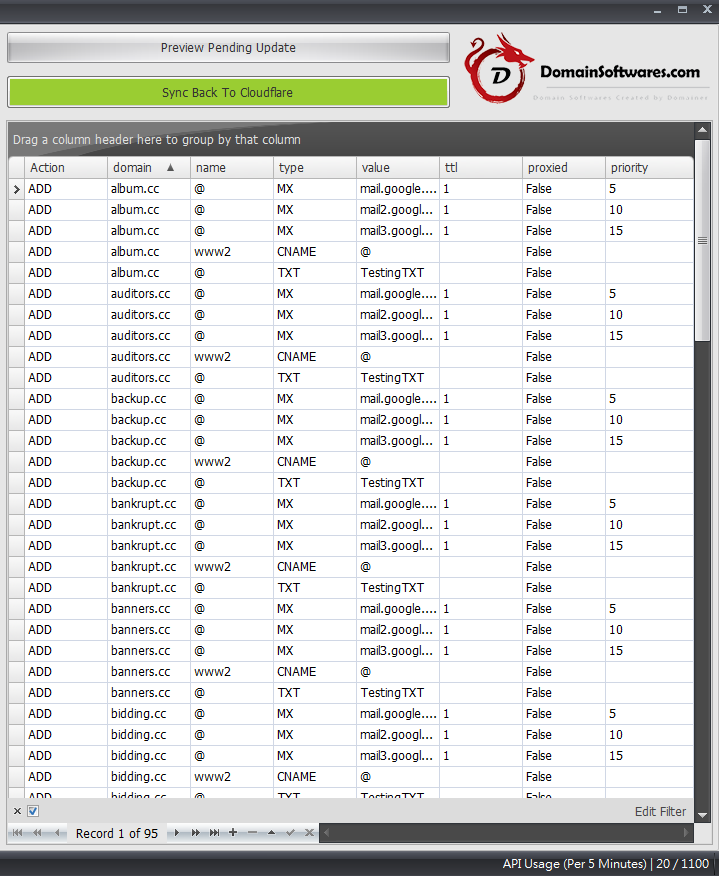
4) Click Get All DNS Records to get all records listed in the lookup list.
5) After that, you can start to use below section to Add New DNS Records or delete DNS records.
Tips: Use @ instead of the full domain names when you are doing bulk add for different domains.
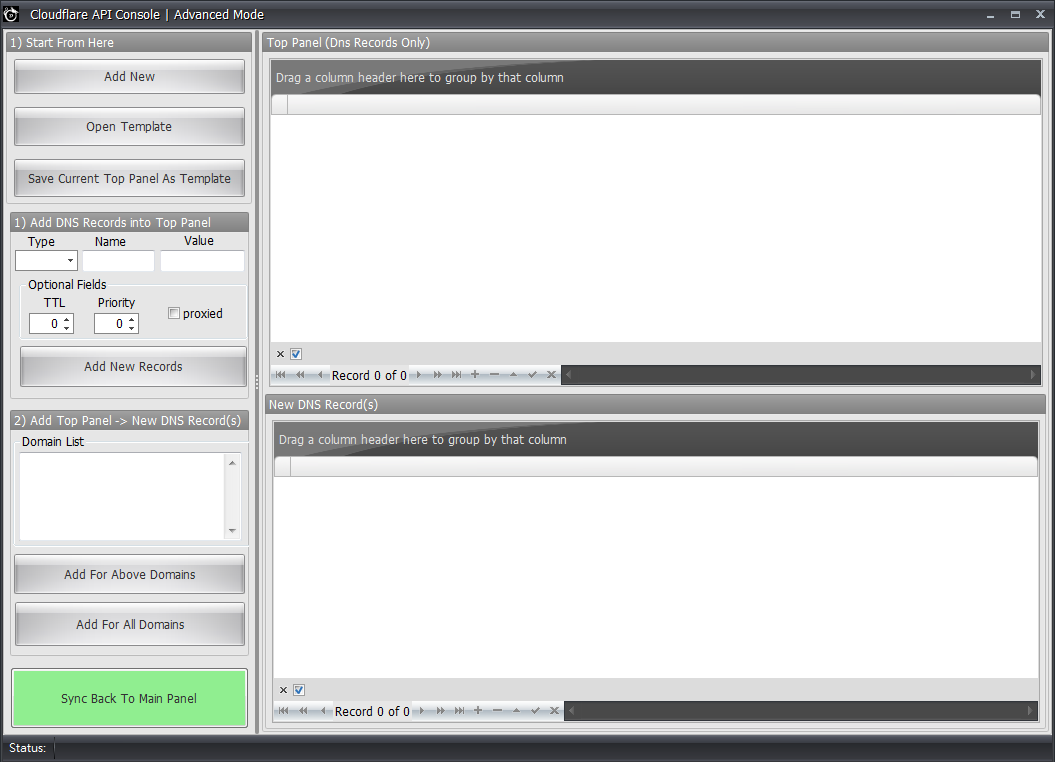
6) Advanced Mode
Click Add New Or Open Template
Fill in the “Add DNS Records into Top Panel” Section and click Add new records (Tips: Use @ instead of Domain Names)
The Records are now showed up on top right panel.
Now, you can choose add the DNS Records to All Domains or Select Domains from the bottom left.
Then you can preview the pending add records via bottom right panel, if everything all right, click the green button to sync it back to main panel.
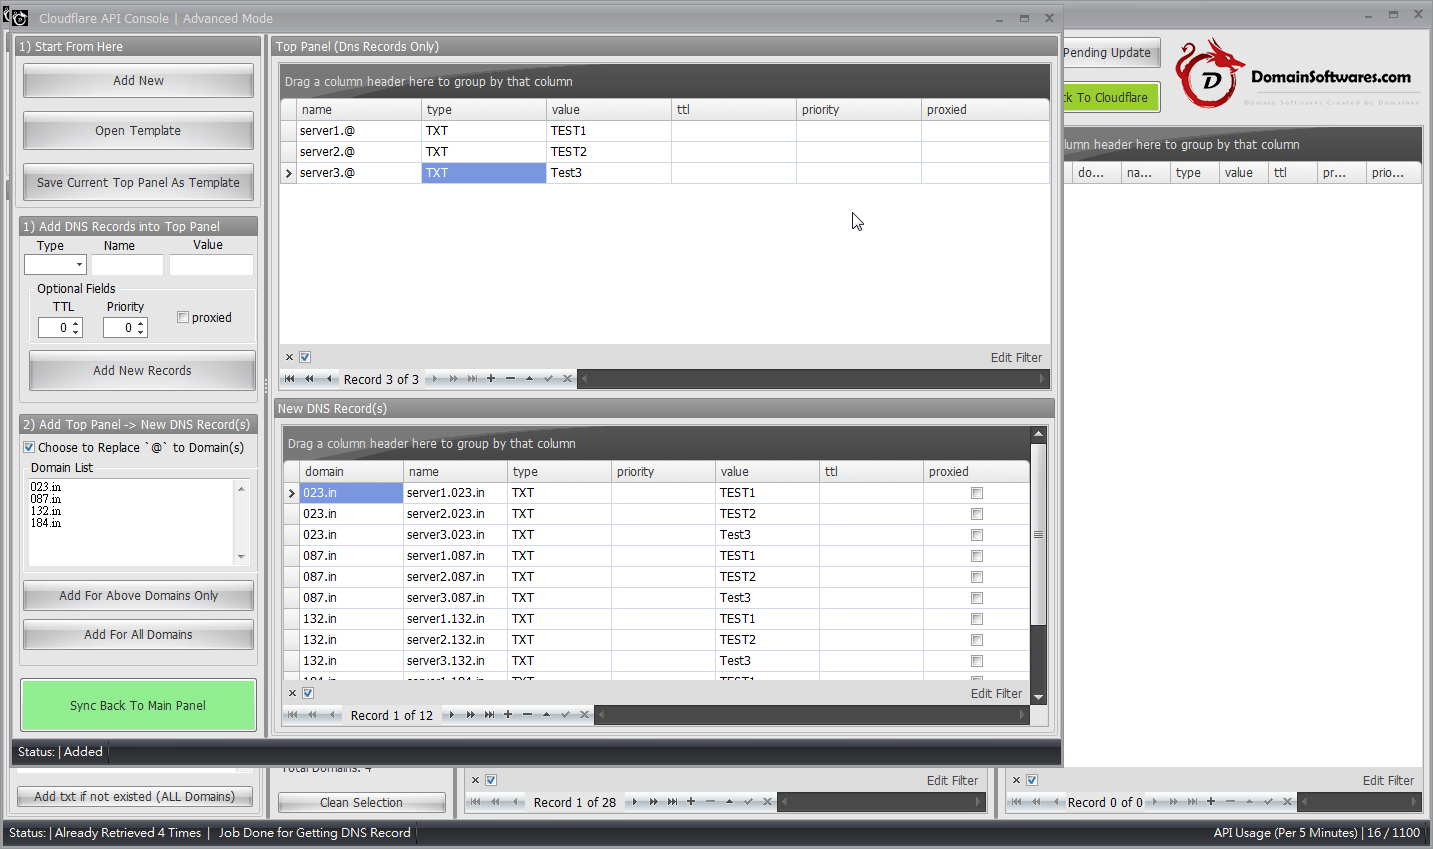
You can choose to replace @ into domain for DNS records. (Since Version 1.6.7)
7) After you made all the changes, click the “Green Sync Back ” button to send the API requests to Cloudflare to make the changes.
If you found that you mess up somethings and don’t want to submit the changes, you can click “Get All DNS Records” to startover.
With this software, you can managed 1000+ domains DNS Records using Cloudflare with ease.
Common Usage
Change an existed A records to a new IP address
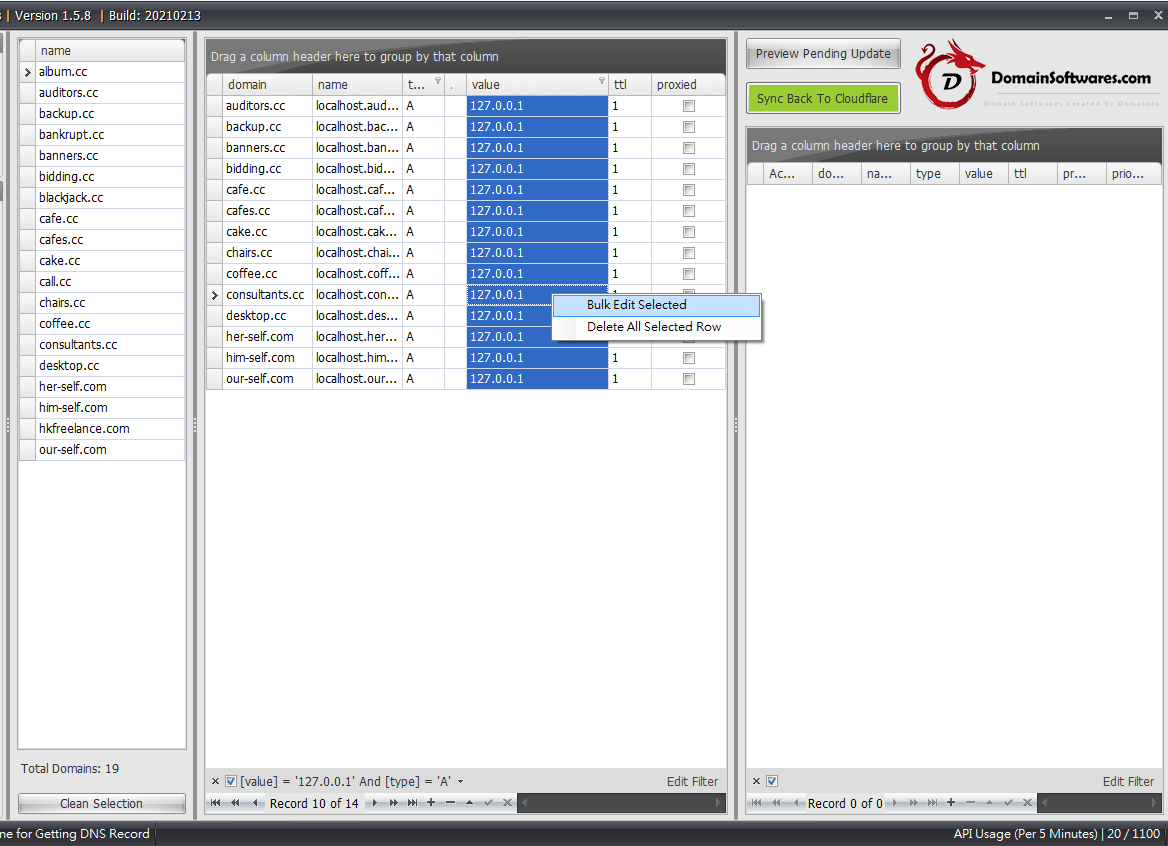
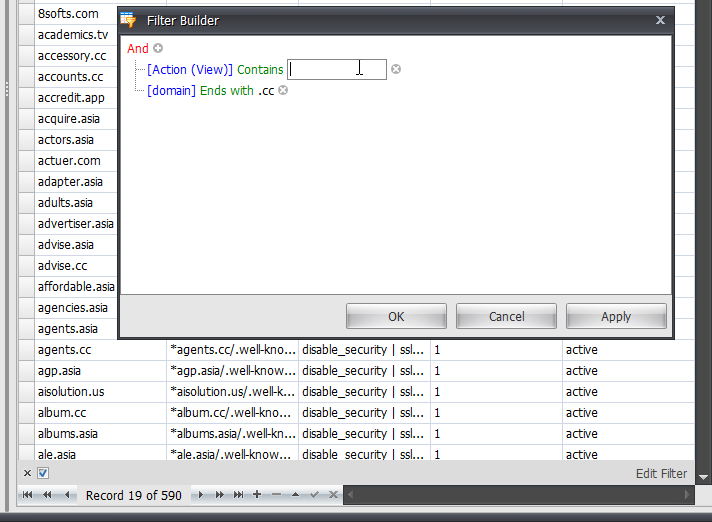
Filter Out the IP address you want to change using filter builder [You can open it by clicking the edit filter button]
Highlight and Bulk Edit the IP address you want to change
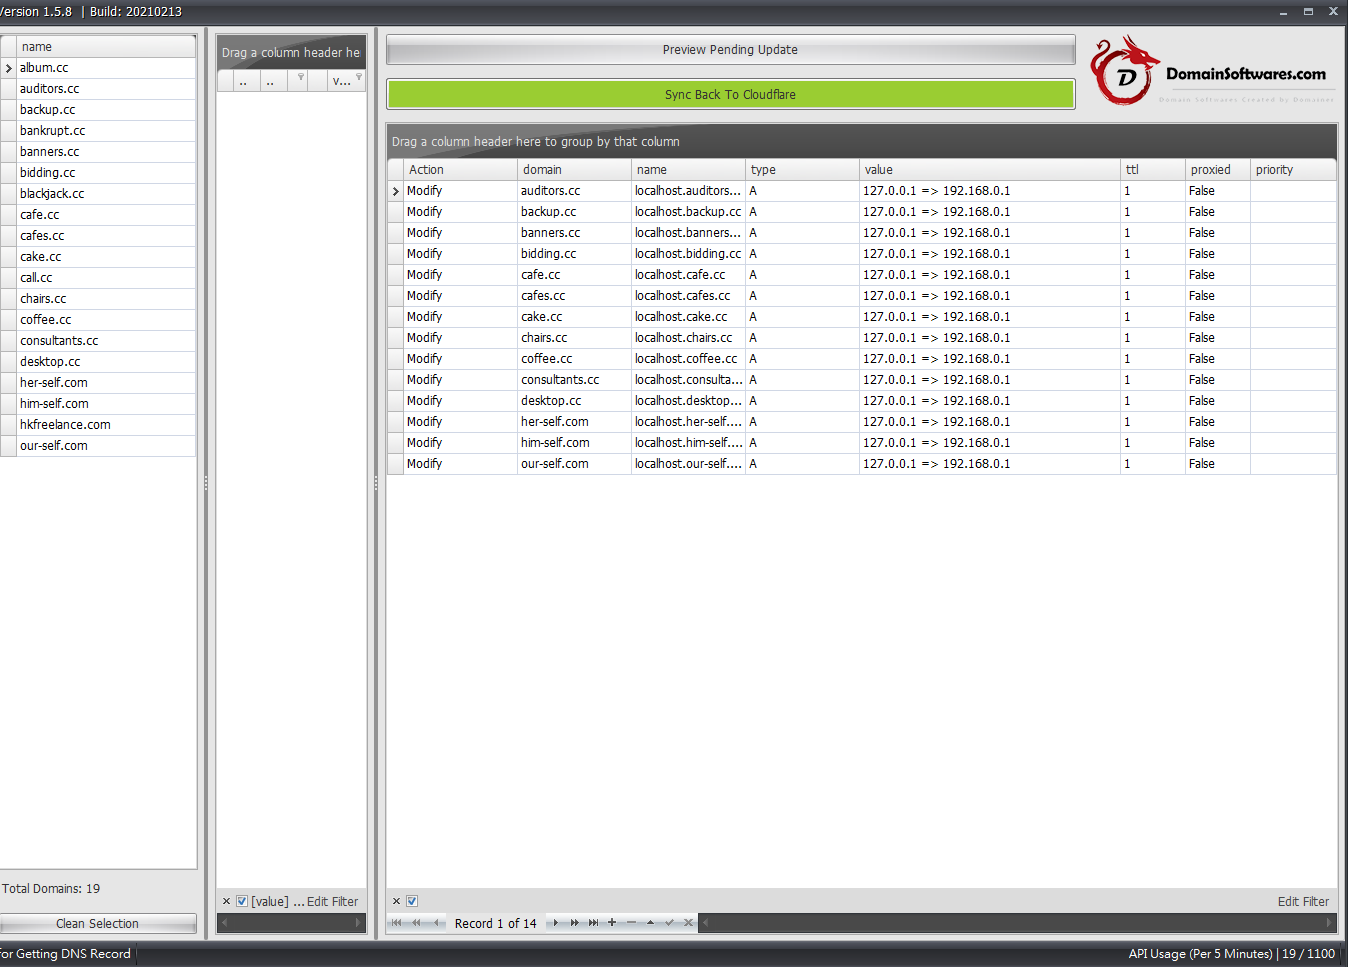
Review the pending change (If your screen resolution is limited, you may want to slide the middle panel to minimize)
Bulk Delete A records for specific domains
For Bulk deletion, You can choose to leave the Name field blank.
Here is a little secret that many SEO experts will not tell you, Dropcatch expired domains for SEO to save money.
It’s really common that SEO experts and online marketers keep buying expired domains for link building and traffic redirect purpose.
There are too many blogs talks about this topic and we are not going to go into details.
Since there’re more and more people buying expired domains with backlinks from expired domain auction, most of the expired domains listed on auction are likely fall into bidding war. The final bidding price can be very high and your cost will be very expensive. It’s really common to see an expired domains finally for bid up to the price range between high $XXX and even $XXXX.
The little secret is there’re still a portion of domains will never fall into expired auction and they’re remain undetected by the public.
In this case, you may want to re-register expired domain using our DropCatch Software, it is now the cheapest way to acquire domains with backlinks for SEO purpose.
If you’re new to dropcatch software, we recommend you to start with our Dynadot dropcatch software. It supports more than 270+ Domain Extensions, including many domain extensions that currently don’t have well-known backorder service provider.
Are you tired of seeing expired domains fall into bidding wars and ending up costing you more than you wanted? Get the most out of your link building and traffic redirecting efforts by utilizing one time fee DropCatch Software to re-register your expired domains with backlinks for SEO purposes. Avoid the costly auctions and make your money go further.
Don’t miss out our Dropcatch Software for just $49 USD!
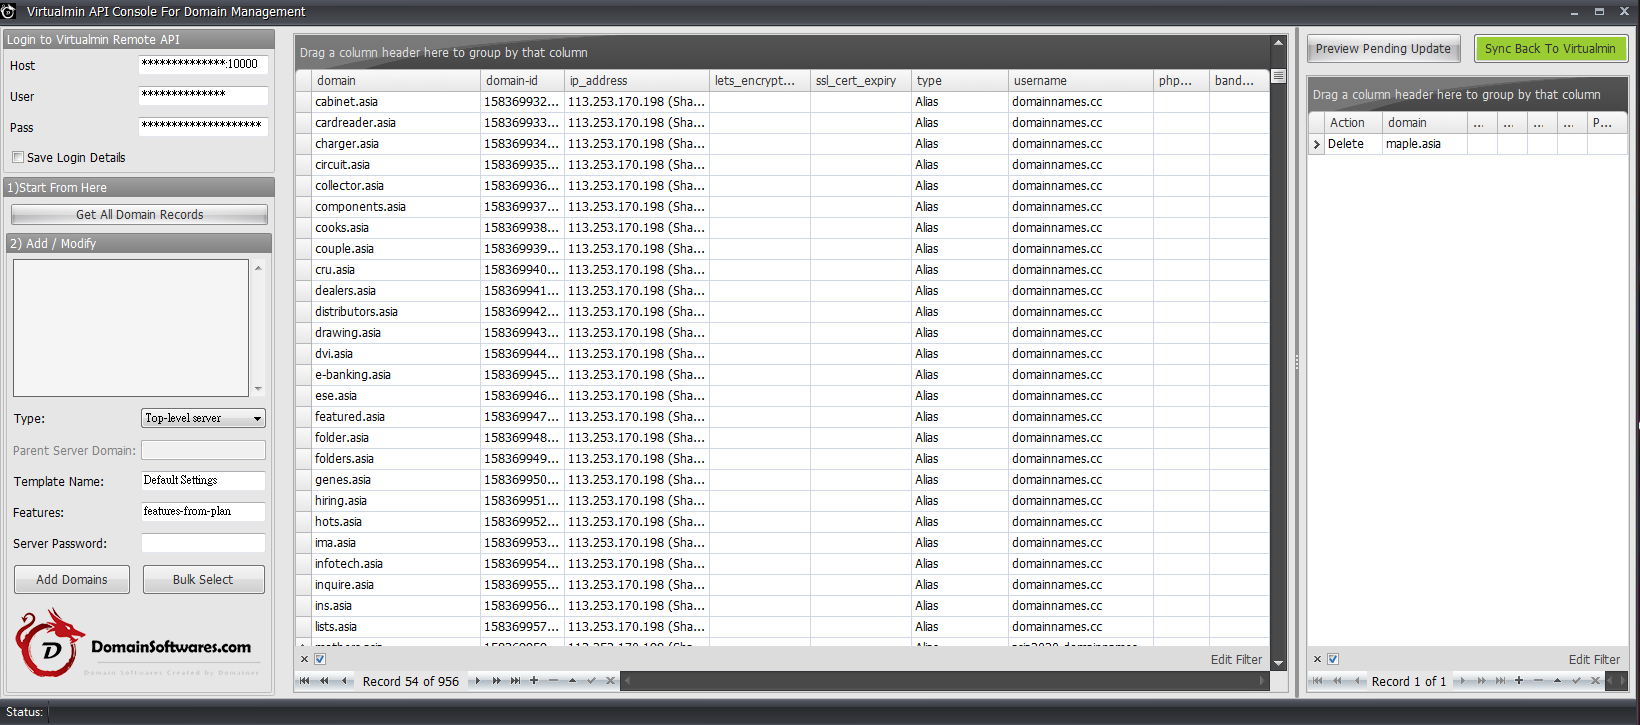
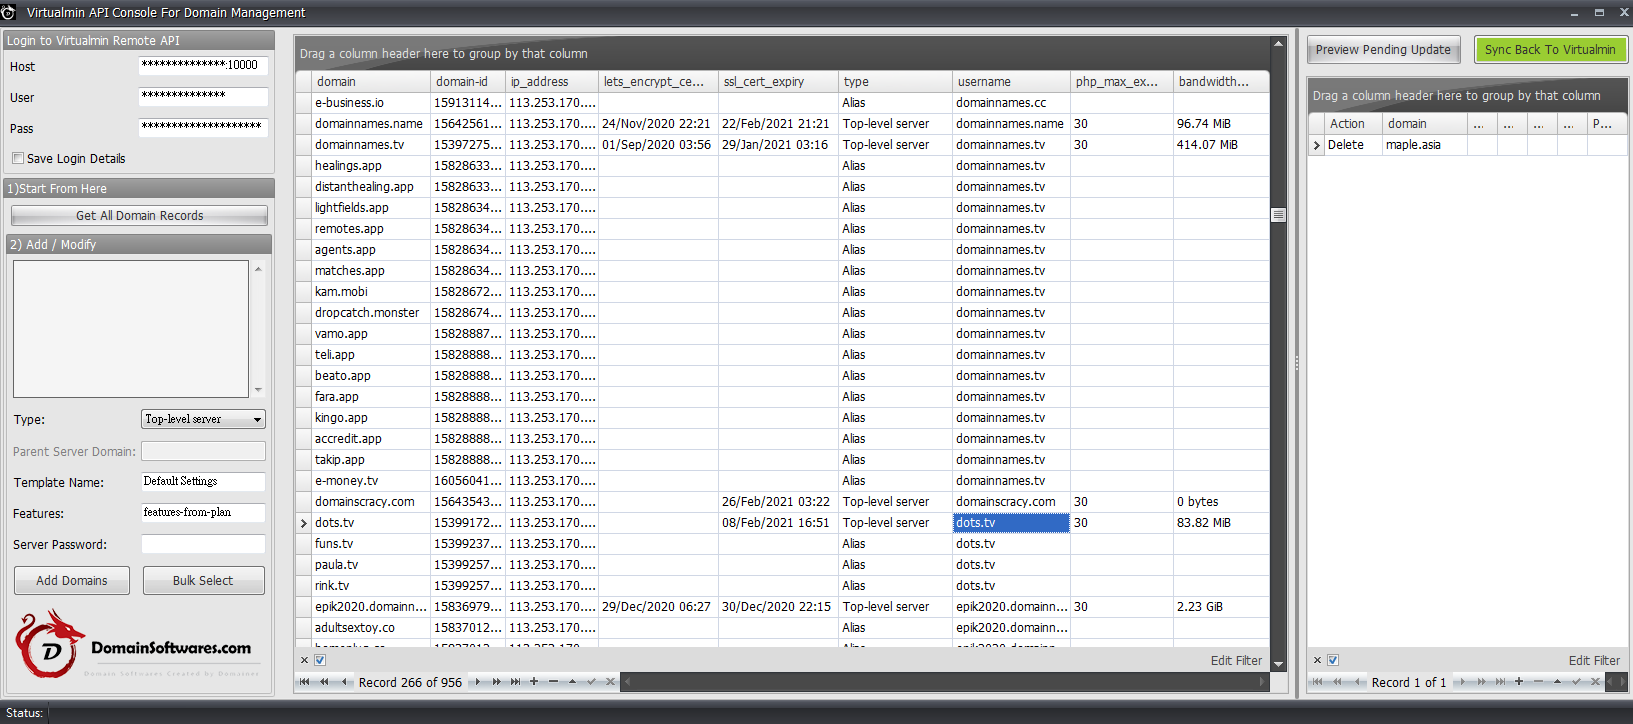
We are glad to announce that Virtualmin API Console For Domain Management is released.
Virtualmin API Console For Domain Management will allow you to bulk add / delete domains into Virtualmin, domains can be added as a Top-Level server or Alias server (Add on Domains).
This tool will save you a lot of time if you want to self-host your domain portfolio site with 1000+ domains.
Since Virtualmin API Console For Domain Management only provides limited functions, It will bundle into Virtualmin API Console for DNS Records for FREE.
Screenshot
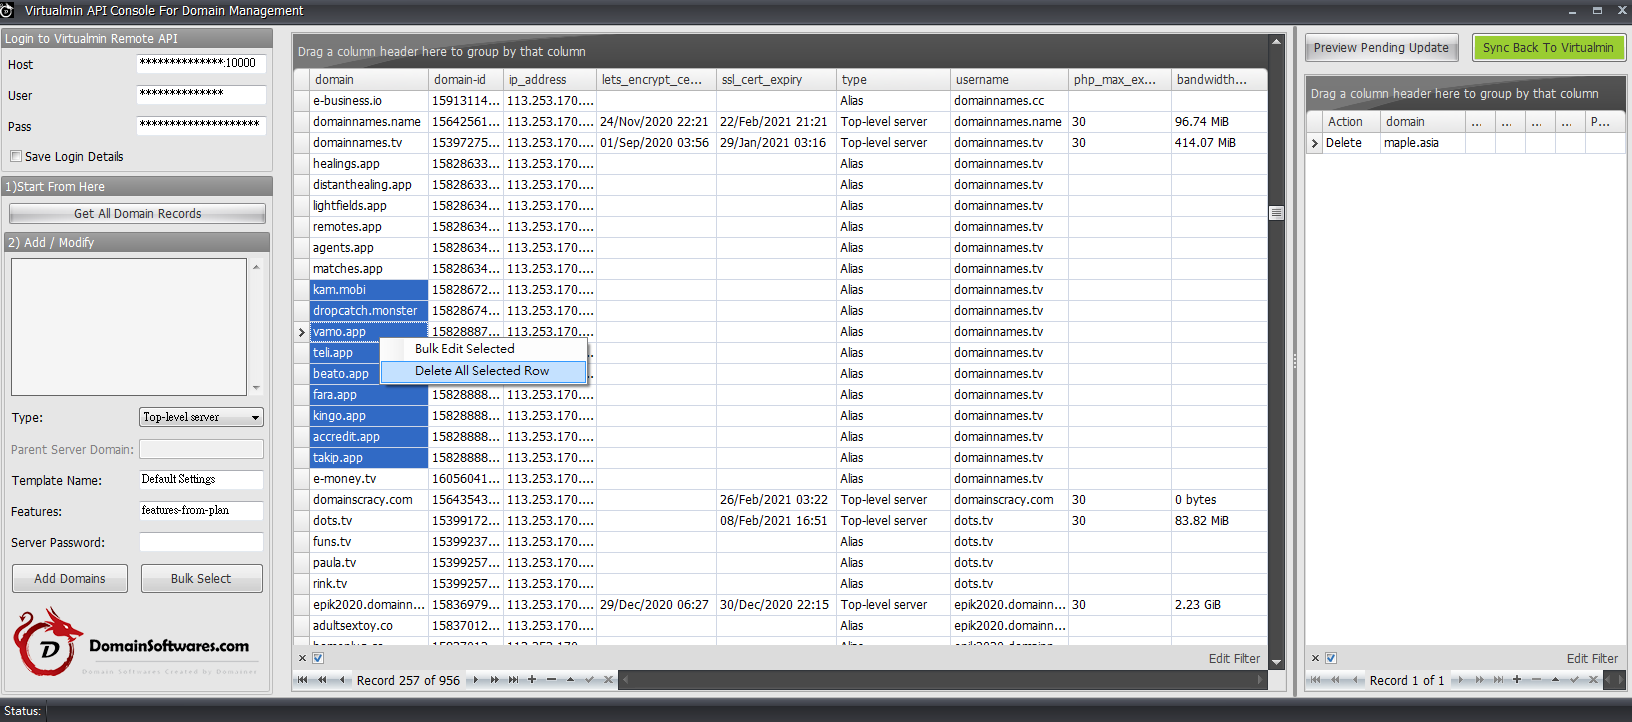
You can bulk delete domains (Virtualmin Called them Virtual Server)
It’s not a good idea to Access Virtualmin API Remotely using root account. Therefore you should create a new user solely for Virtualmin API remote access. Webmin-> Webmin Users -> Create a new privileged user Set the username and password Tick the Virtualmin Virtual Server under Servers section, then click ‘Create’ button Now […]
We have received a few emails asking about how fast is our dropcatch software? Is there any tips in drop catching domains?
The answer: in the game of domain drop catching, speed is everything.
The connection latency between your server and registrar server play a critical role and dramatically affect the successful rate.
Imagine that you’re using home server while you’re located in Asia Country. You possibly only get around 2 or 3 responses per second.
If you want to improve the drop catching speed you will have to rent a VPS / dedicated server located in US.
6 responses within a second with VPS located in US,
Above screenshot is captured from one of our VPS, which is hosted on Vultr with windows server 2016 installed.
In above demonstration, the plan we subscribe is High Frequency Plan, Seattle Server, 128GB NVMe, 2CPU, 4GB RAM, which costs $24 per month at Vultr. I personally advice you to rent a server with at least 4Gb ram for reliable performance.
Here is the guide how to create your own windows installation ISO bootdisk, which will allow you to pre-load all the necessary drivers which are required by Vultr VPS environment.
Product Spotlight – Your Domain Selling Store with SyncNames
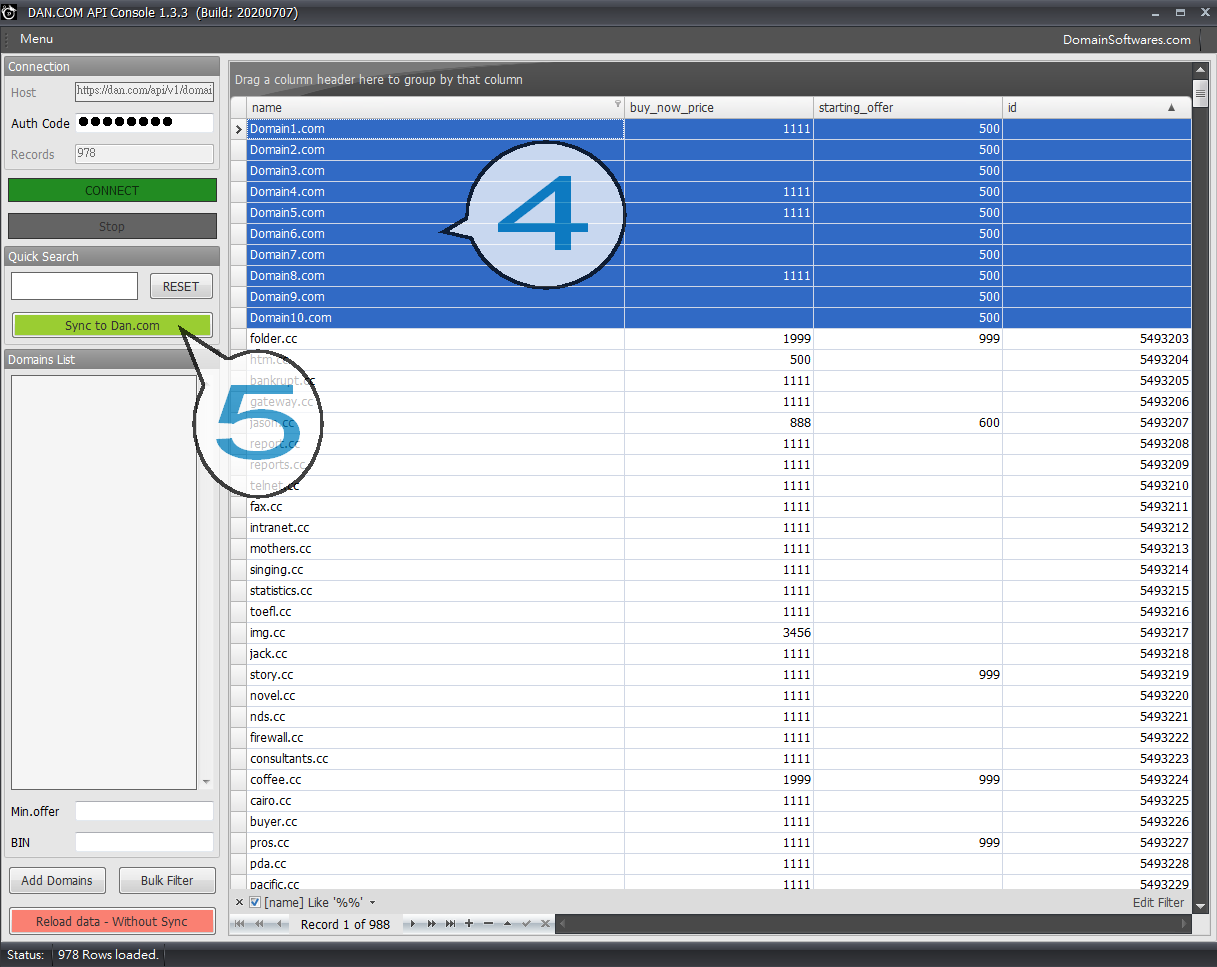
With SyncNames, you will able to add 1000 + domains for sale into your WordPress +Woo Commerce Store in less than 10 minutes.
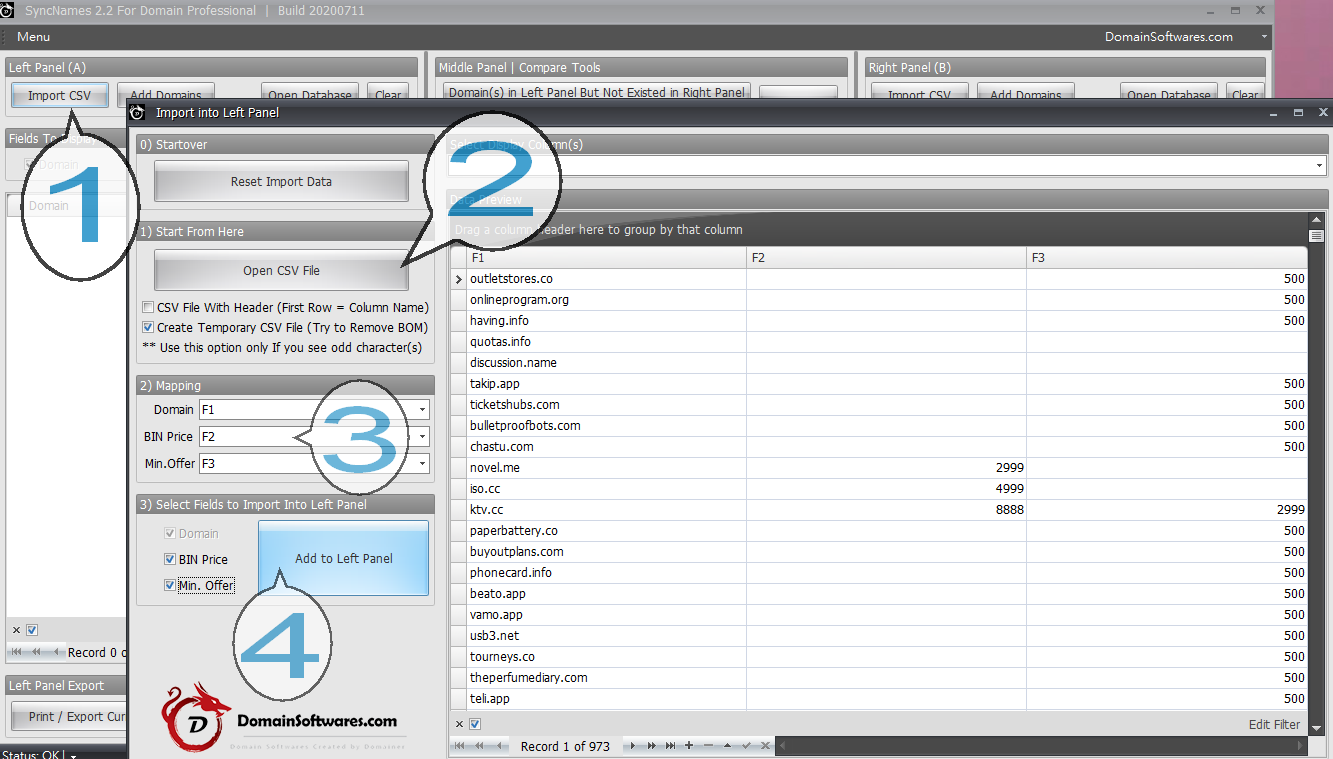
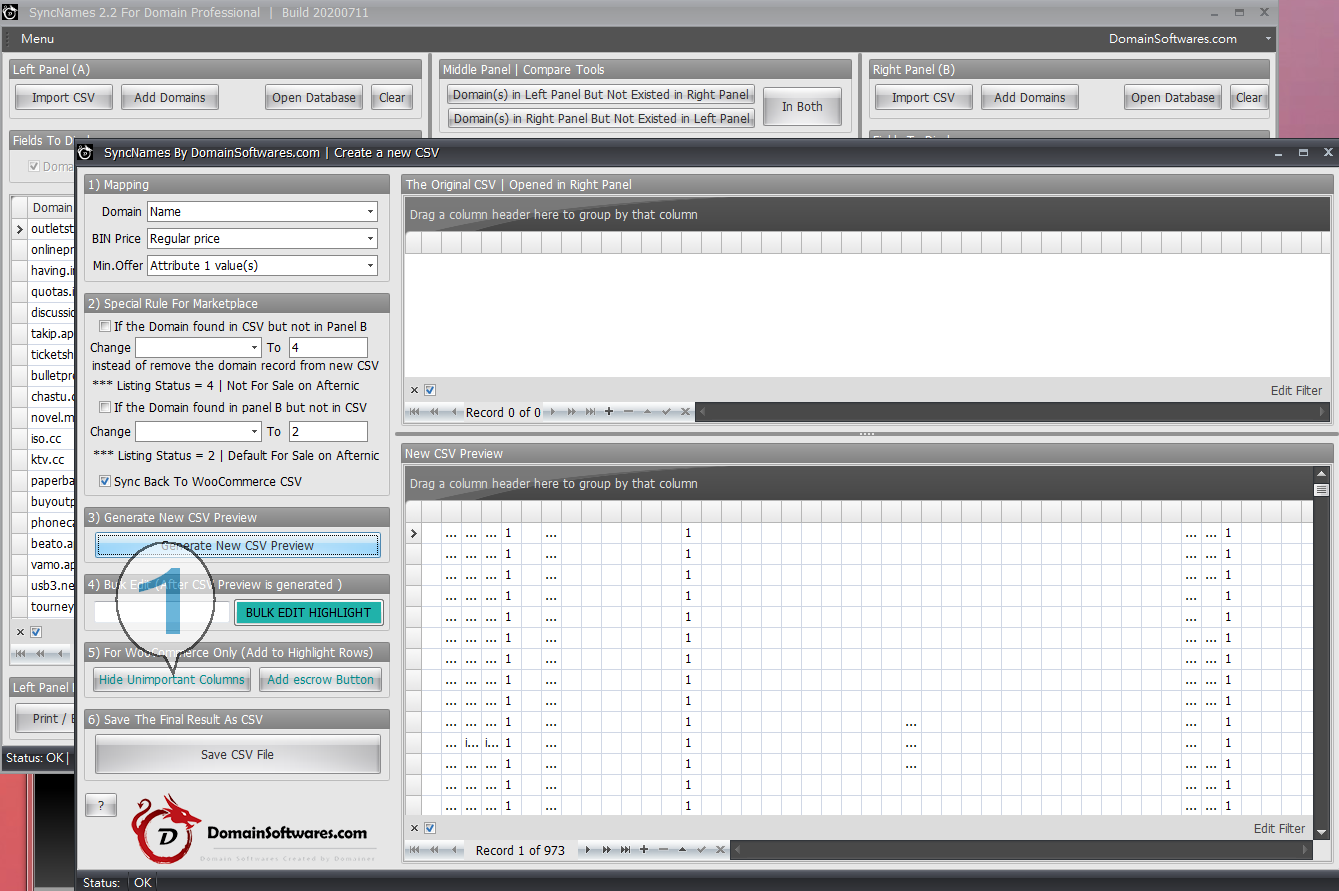
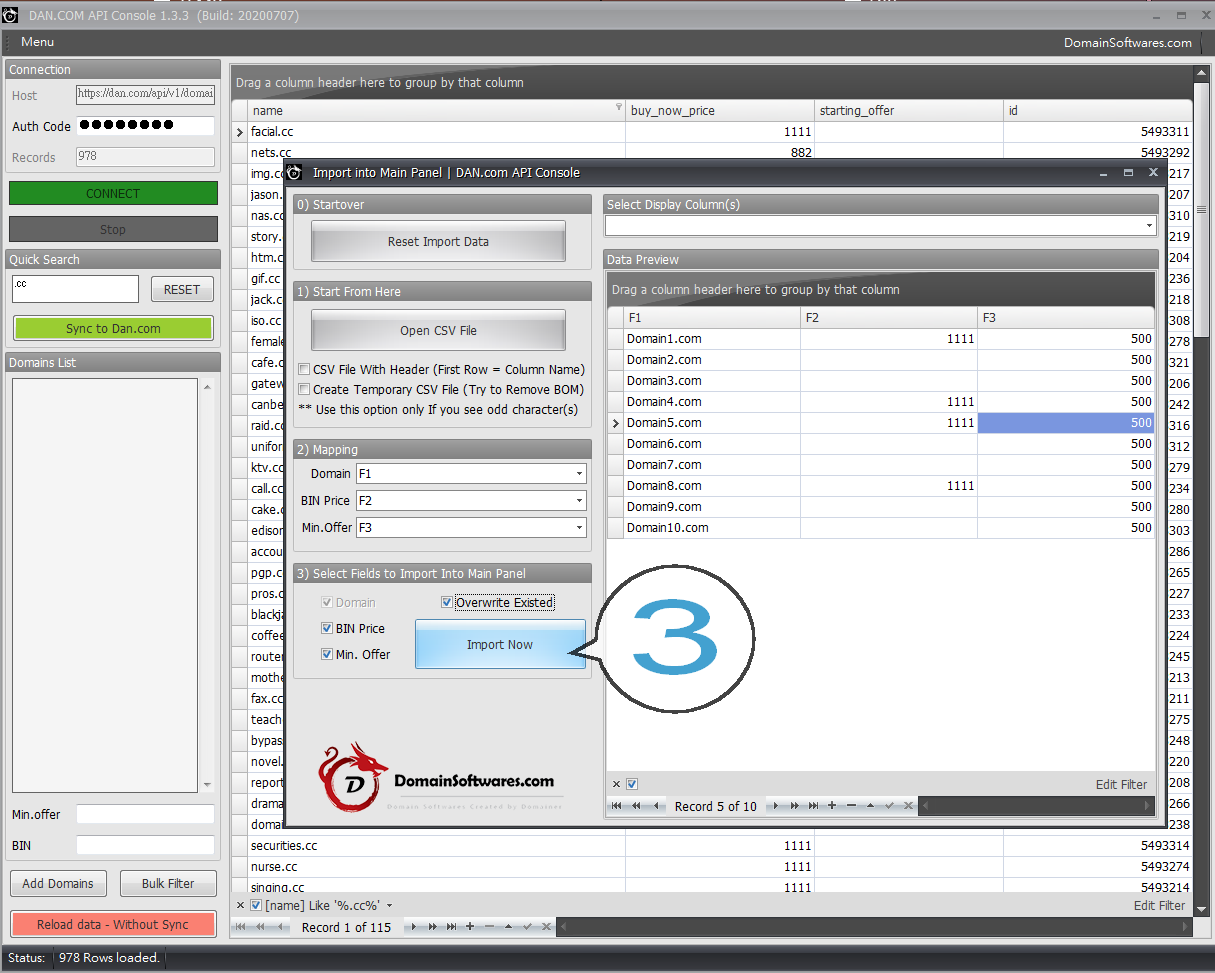
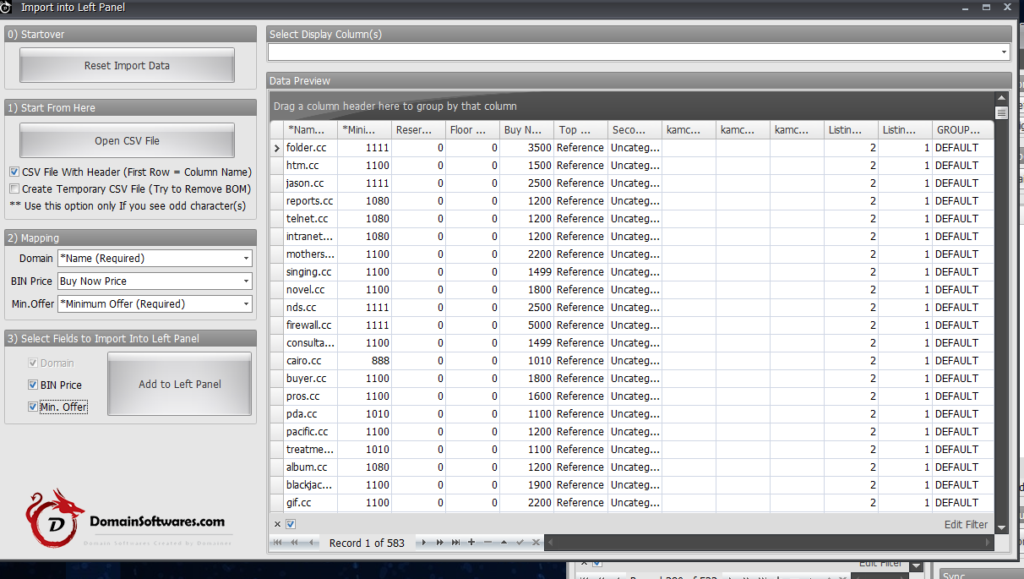
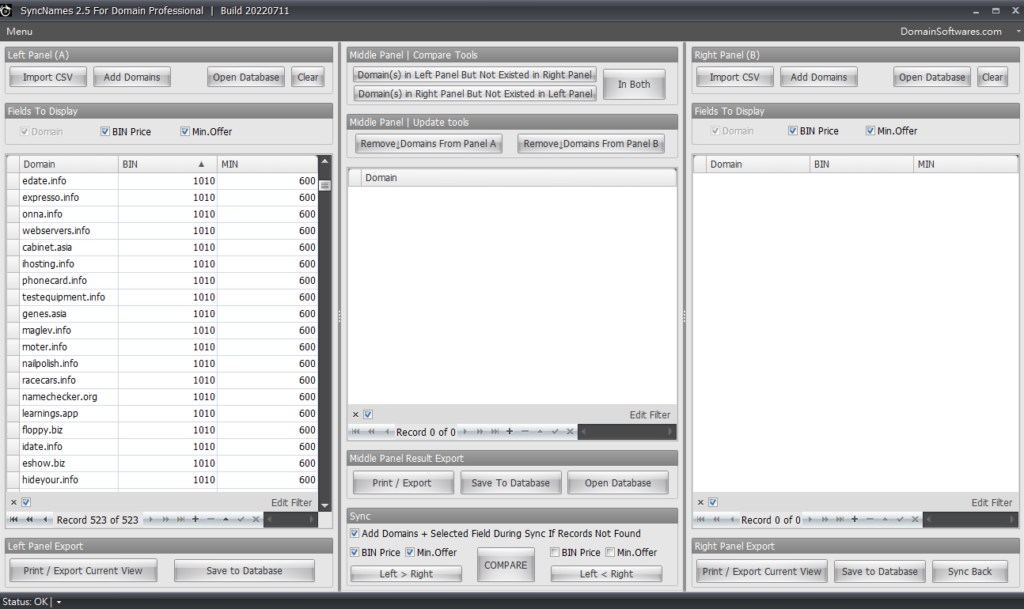
Import CSV (Marketplace CSV file with price) into Left Panel,
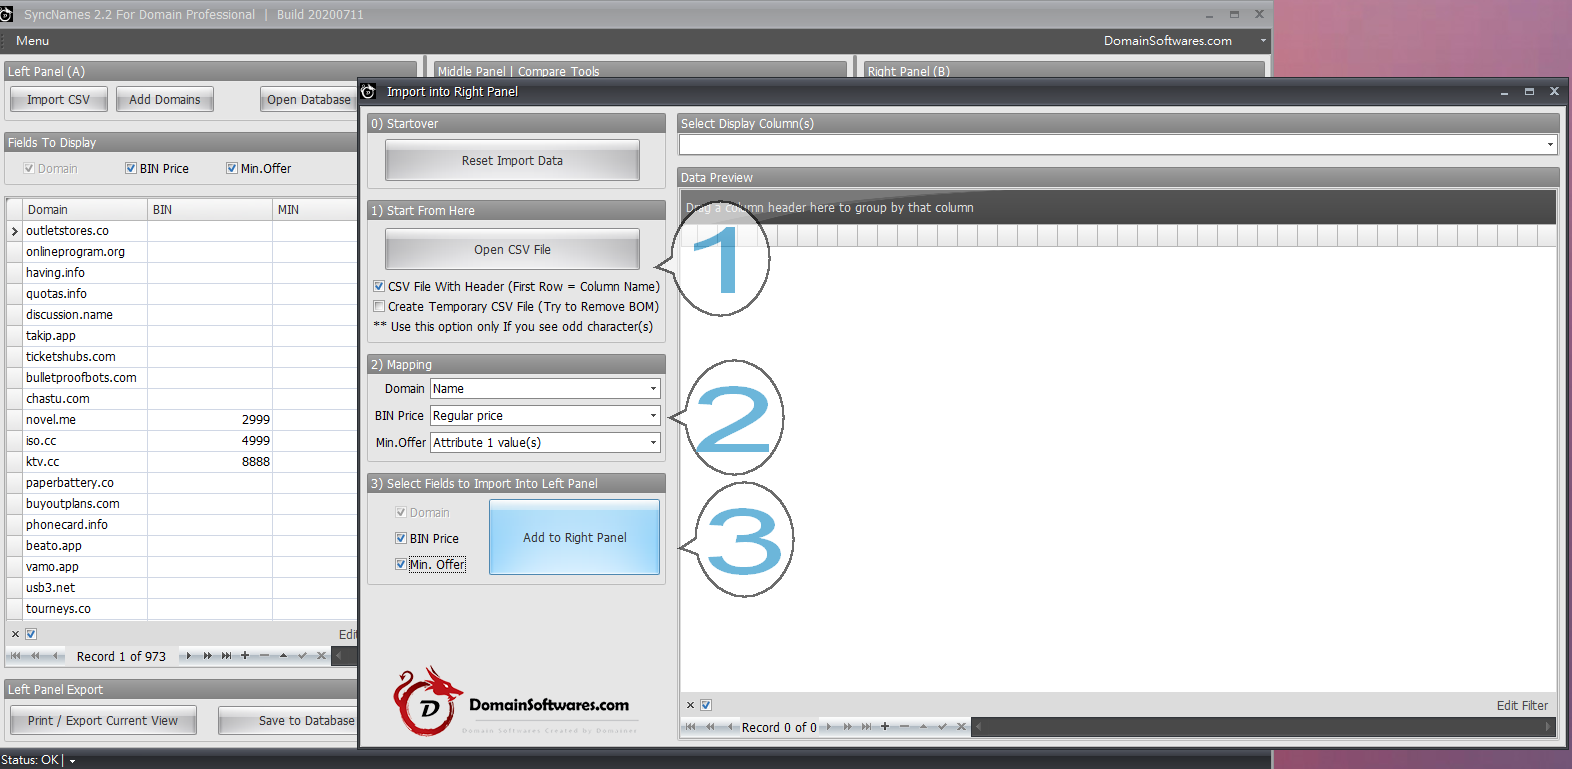
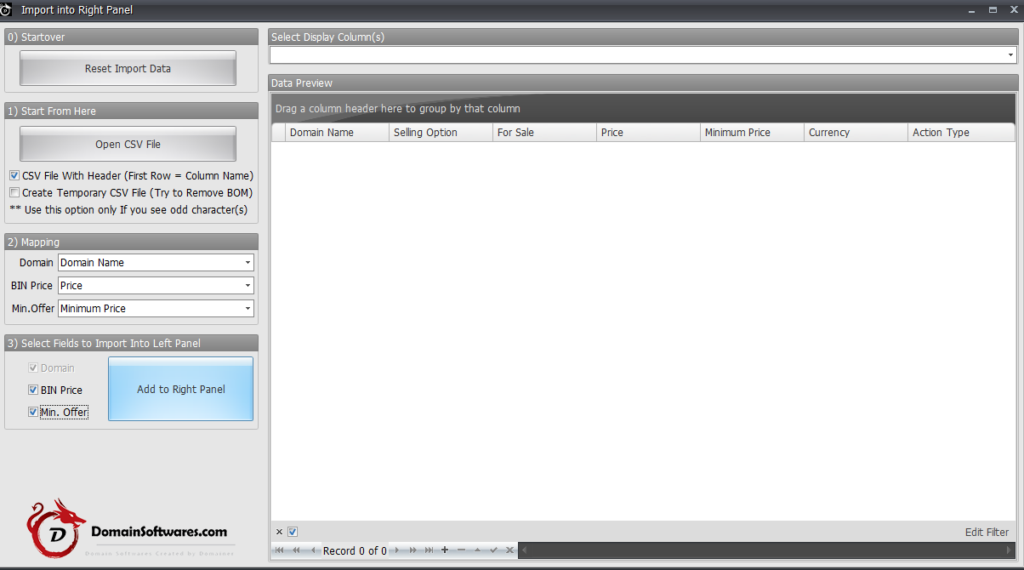
Then, import the blank [woo_products.csv] into Right Panel
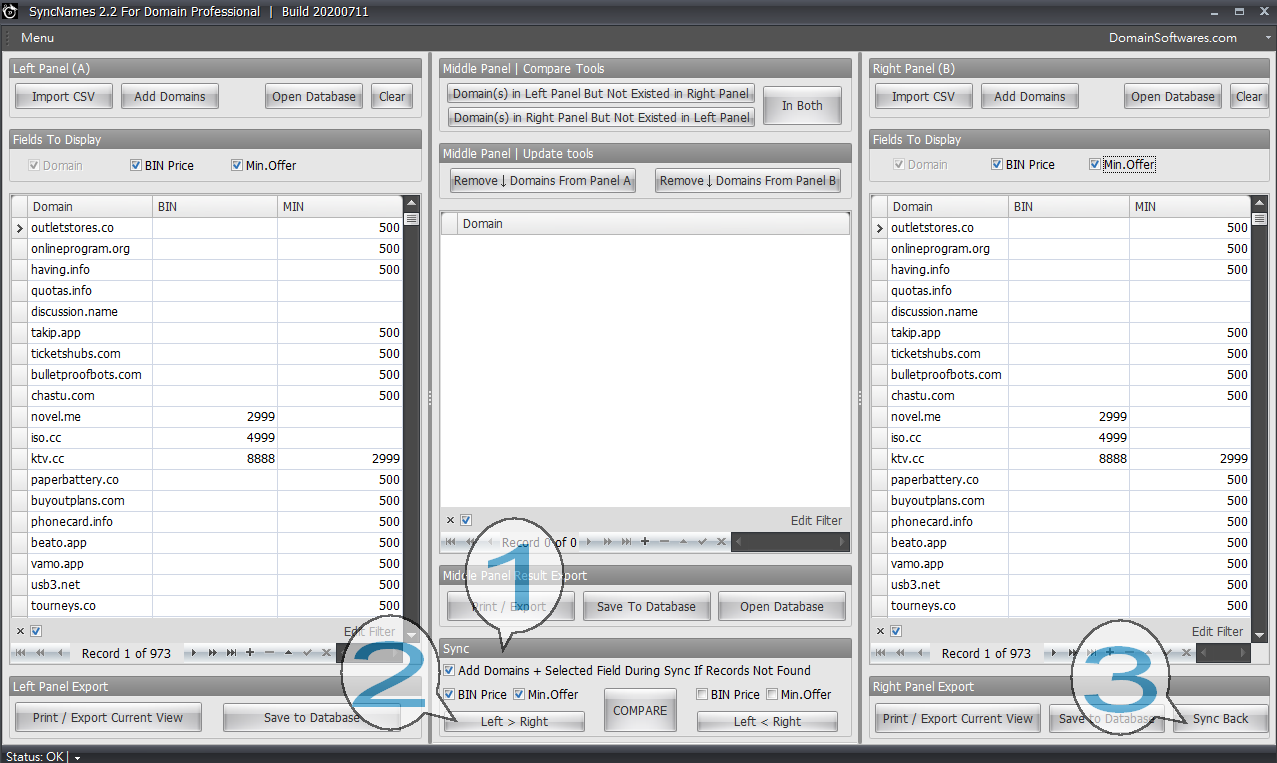
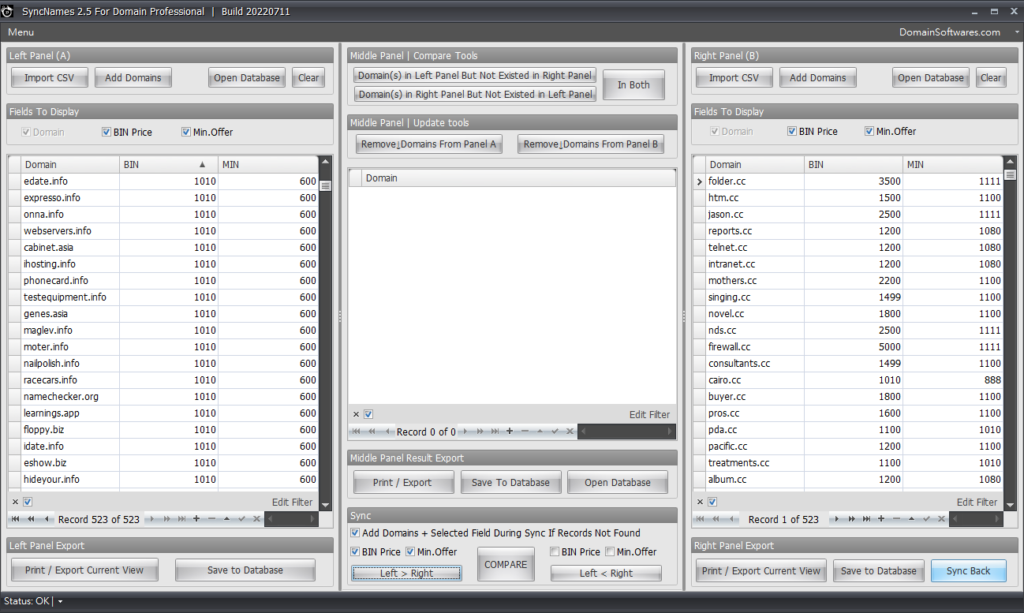
Sync left Panel into Right Panel
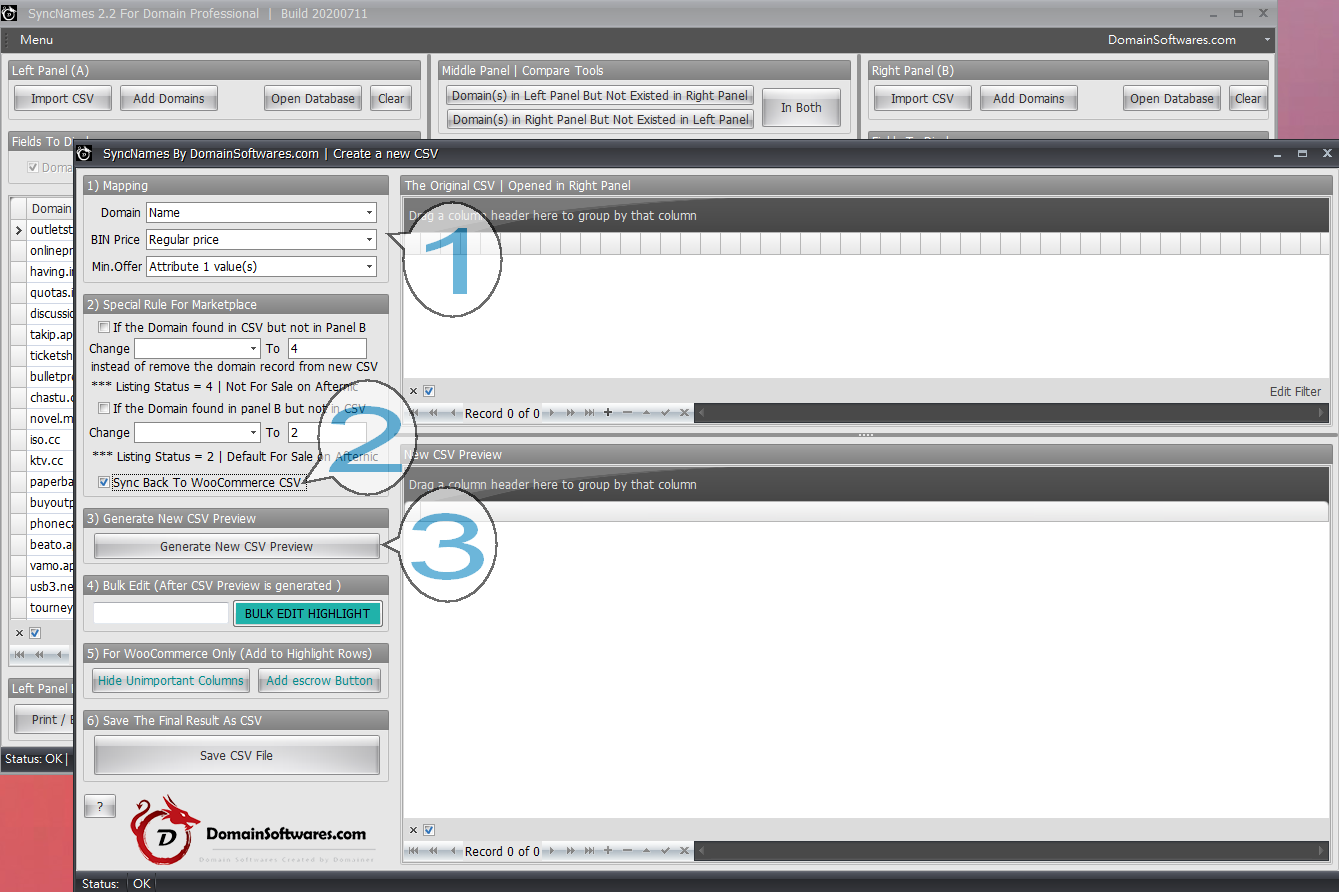
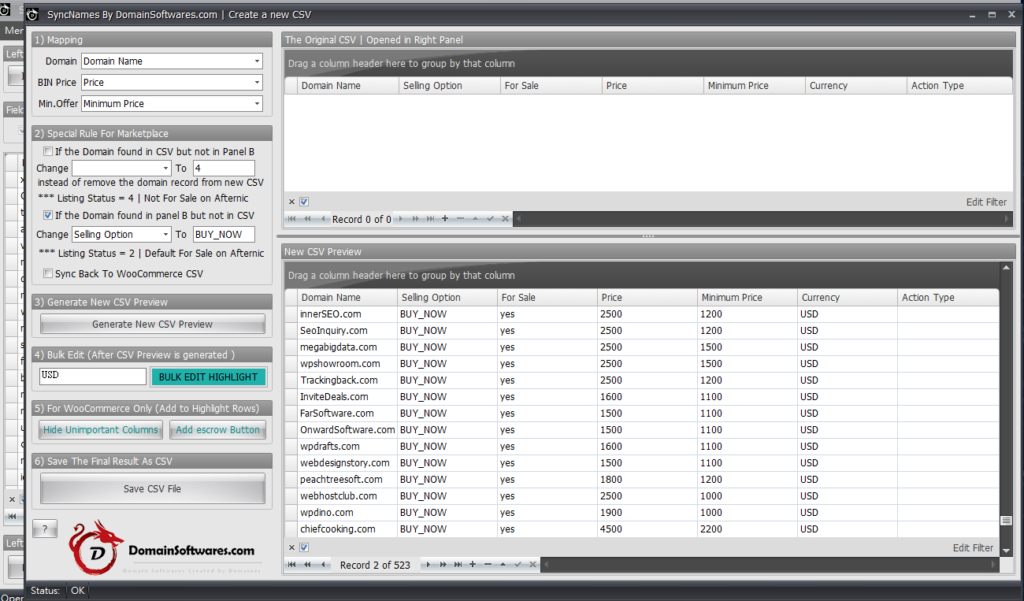
SyncBack into woocommerce blank CSV, you will have to map the fields again.
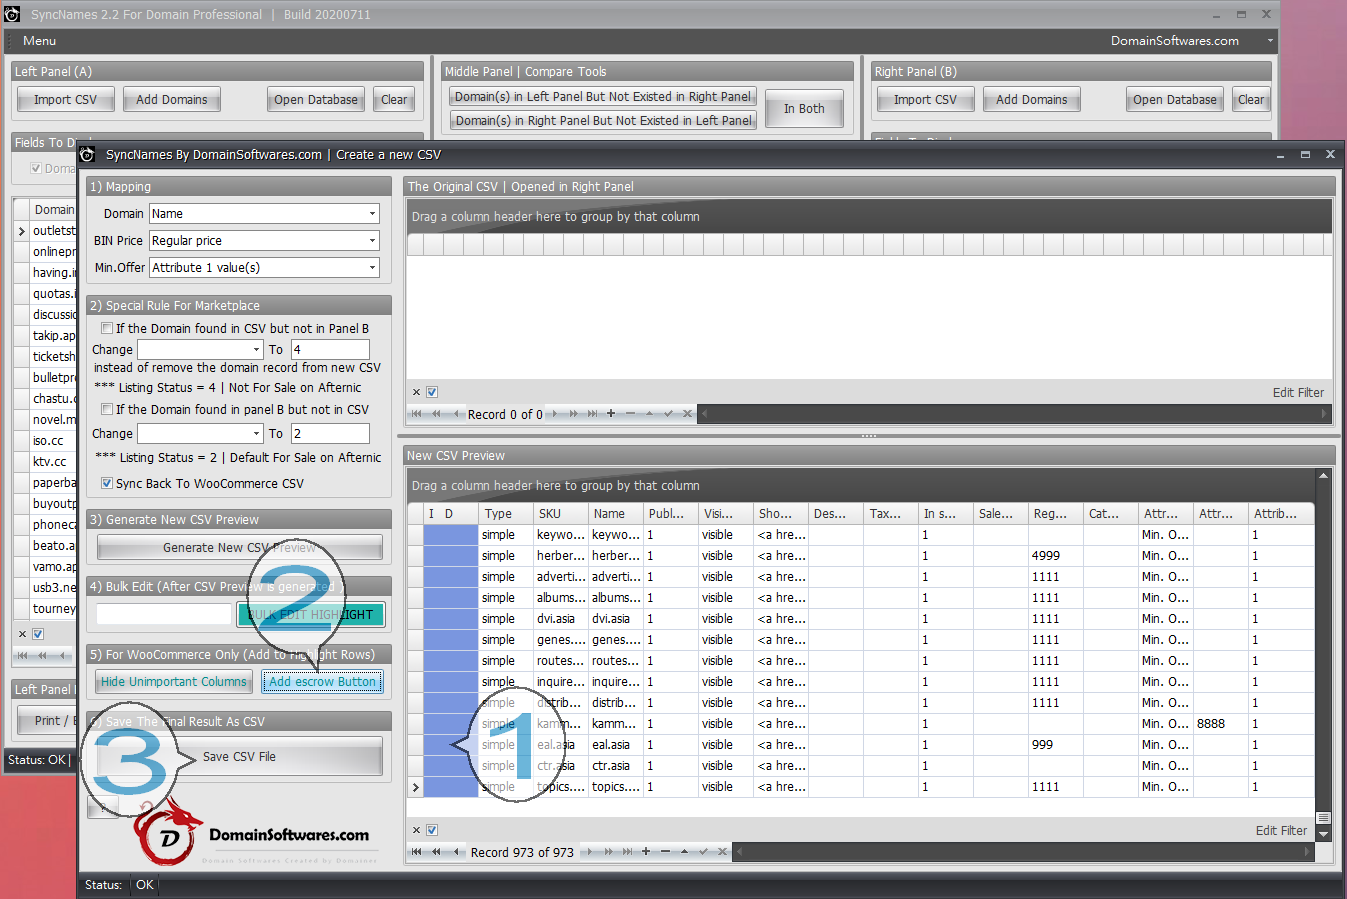
The CSV Preview is now generated. Click the hide the unimportant columns to improve readability.
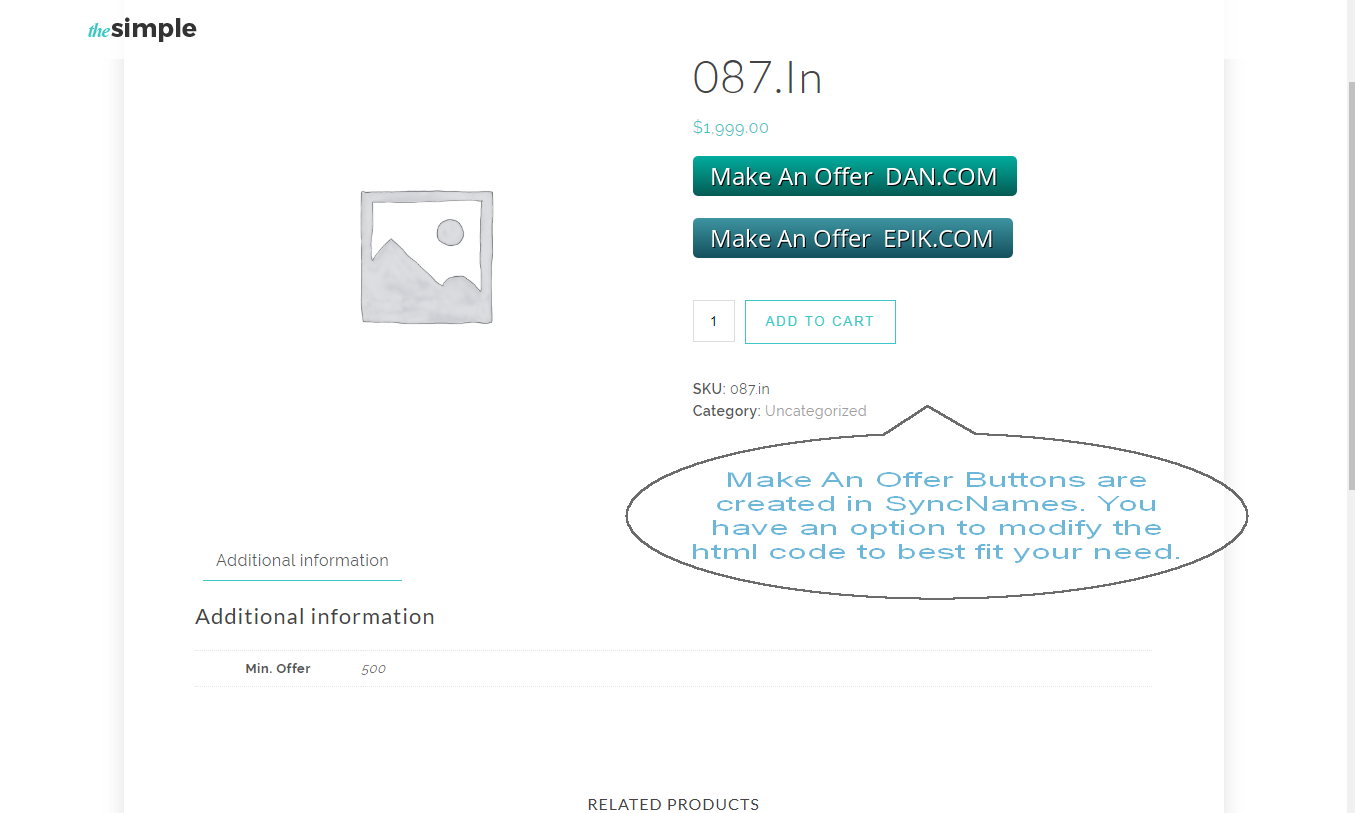
Highlight the rows which you want to auto create the html escrow button, you can also use Ctrl+A to select all. It will auto generate different html code for every domains. The html code is inside EscrowButton.txt and it can be modify to best fit your needs. Finally, don’t forget to create the CSV file.
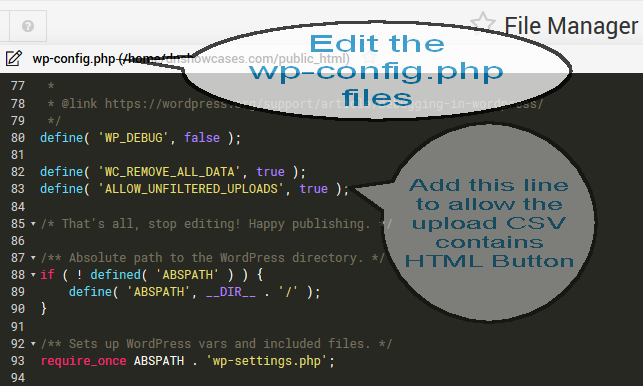
If you choose to use the escrow button, you will also have to modify the following WordPress setting before you import the CSV file into WooCommerce or otherwise your upload CSV will be blocked by WordPress default security setting.
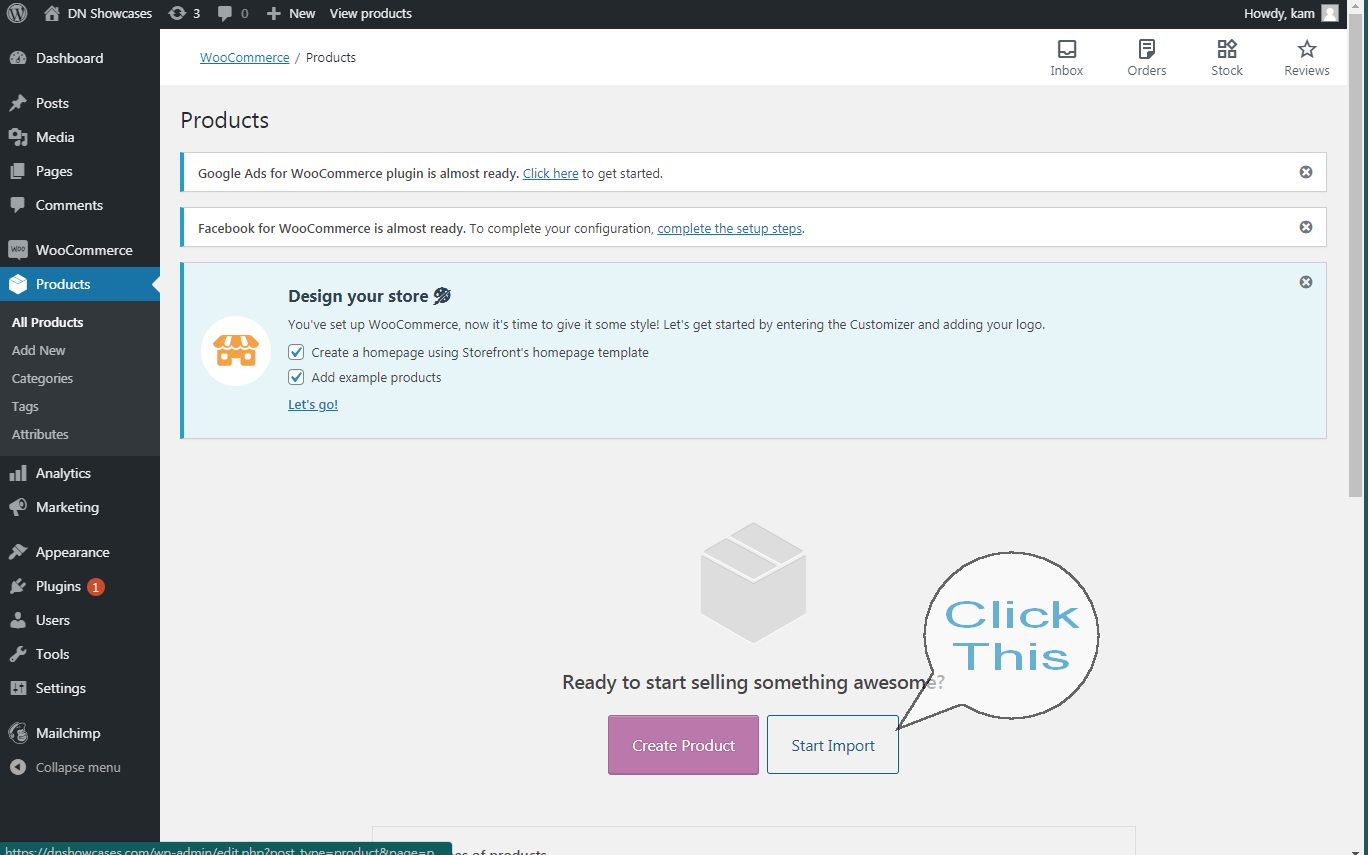
Go to the Product Tab and Click Start Import
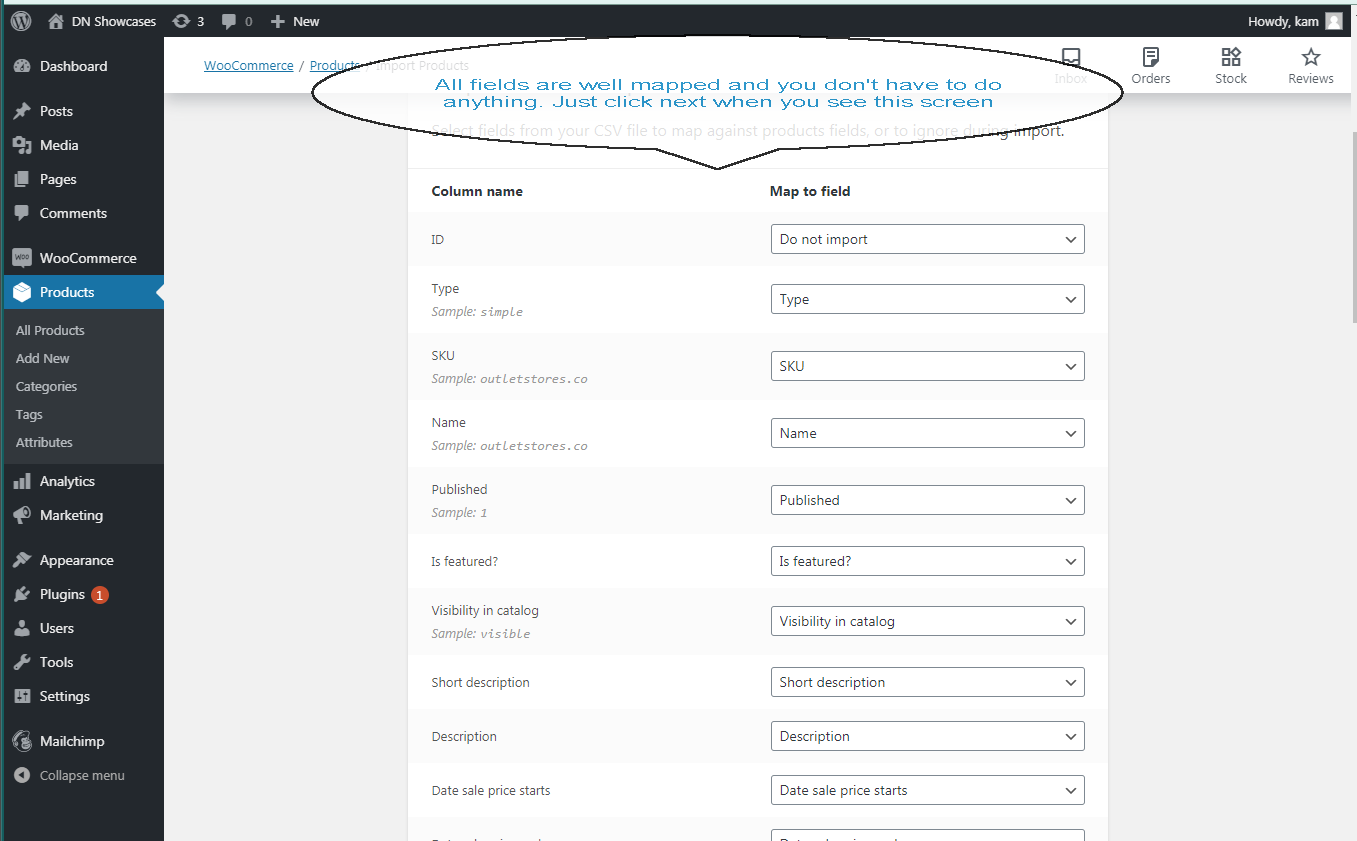
Click Next in this screen
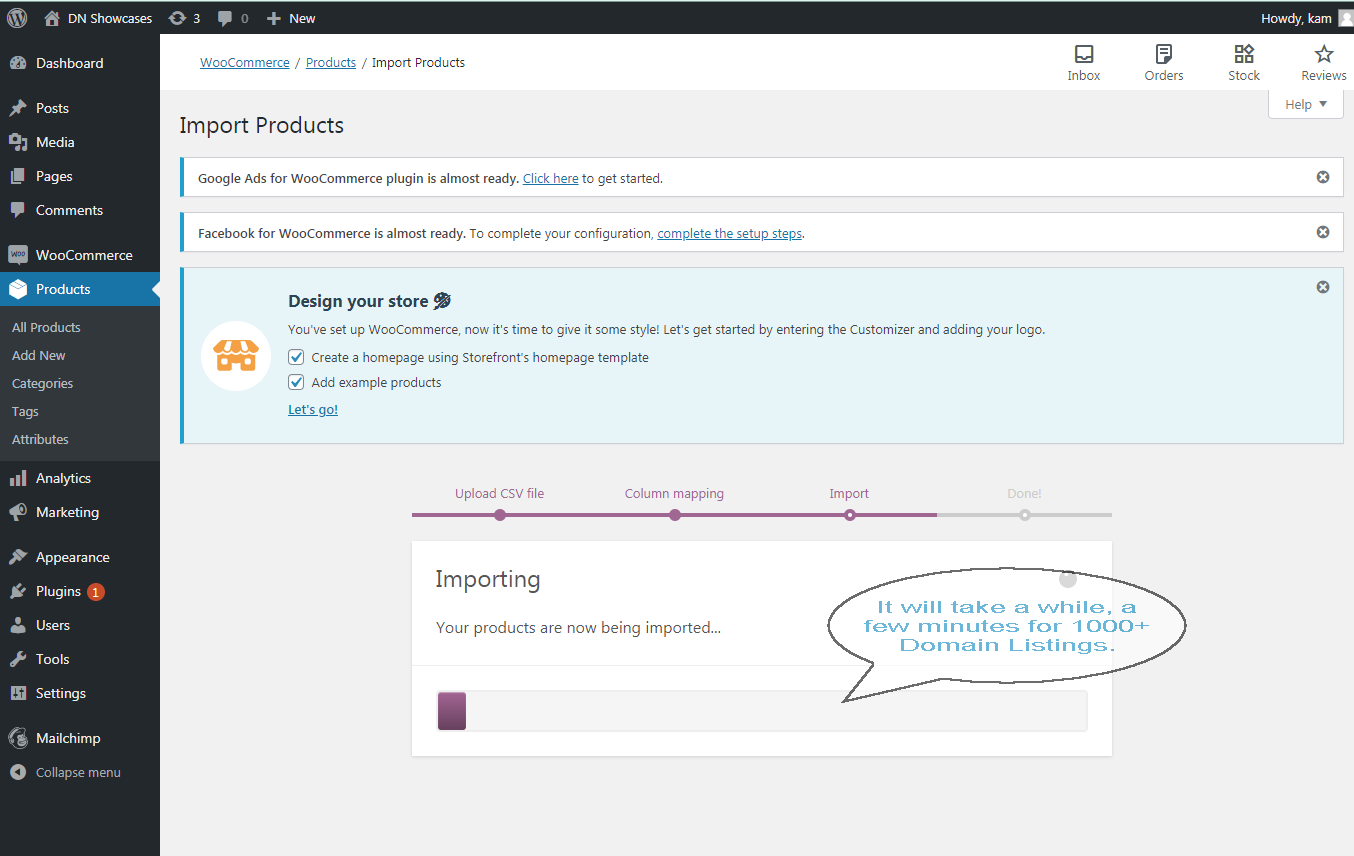
It will take a while for 1000+ Domains
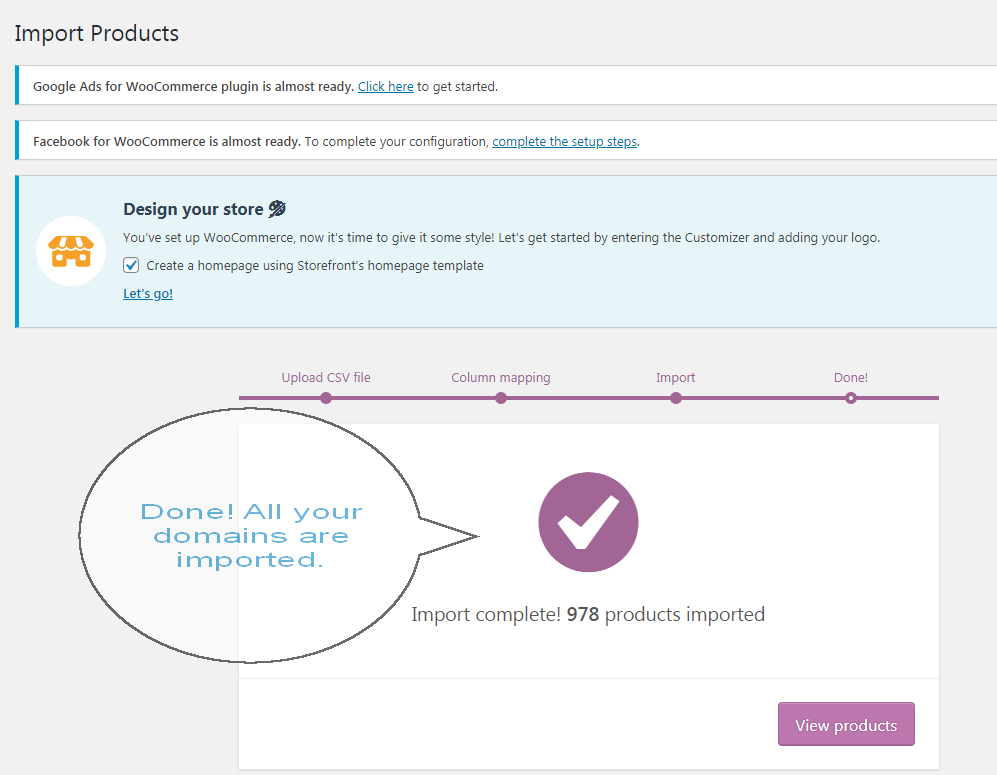
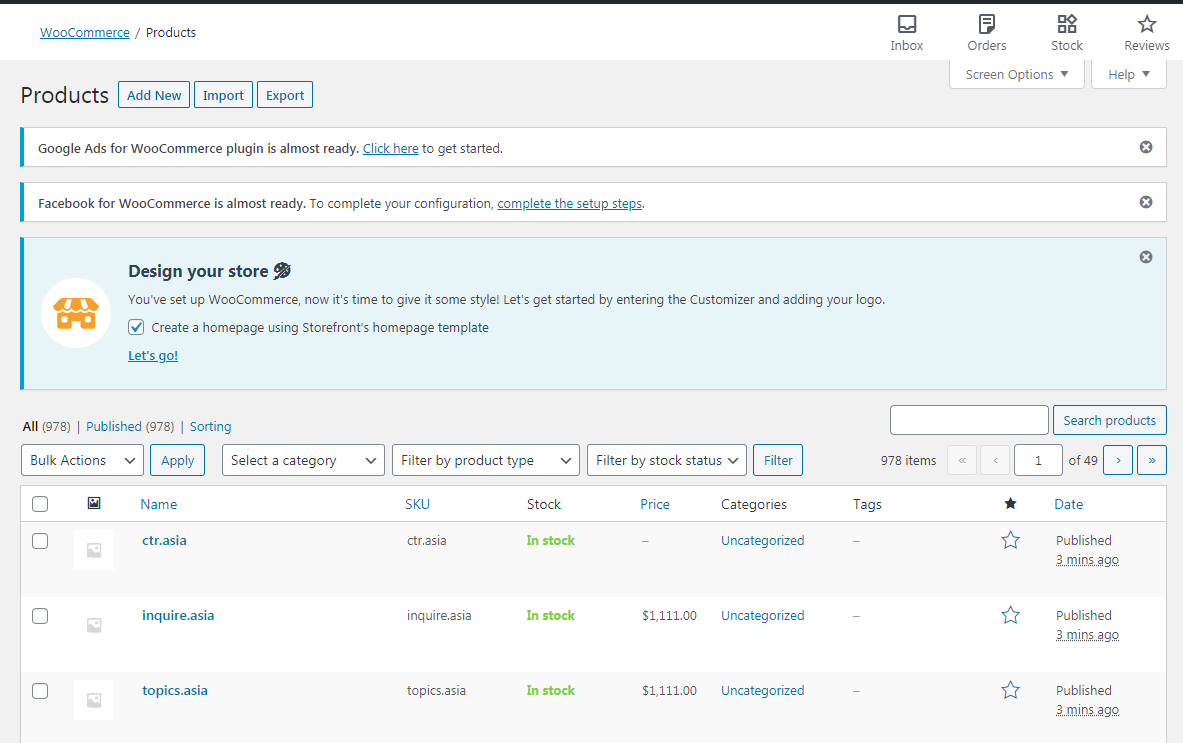
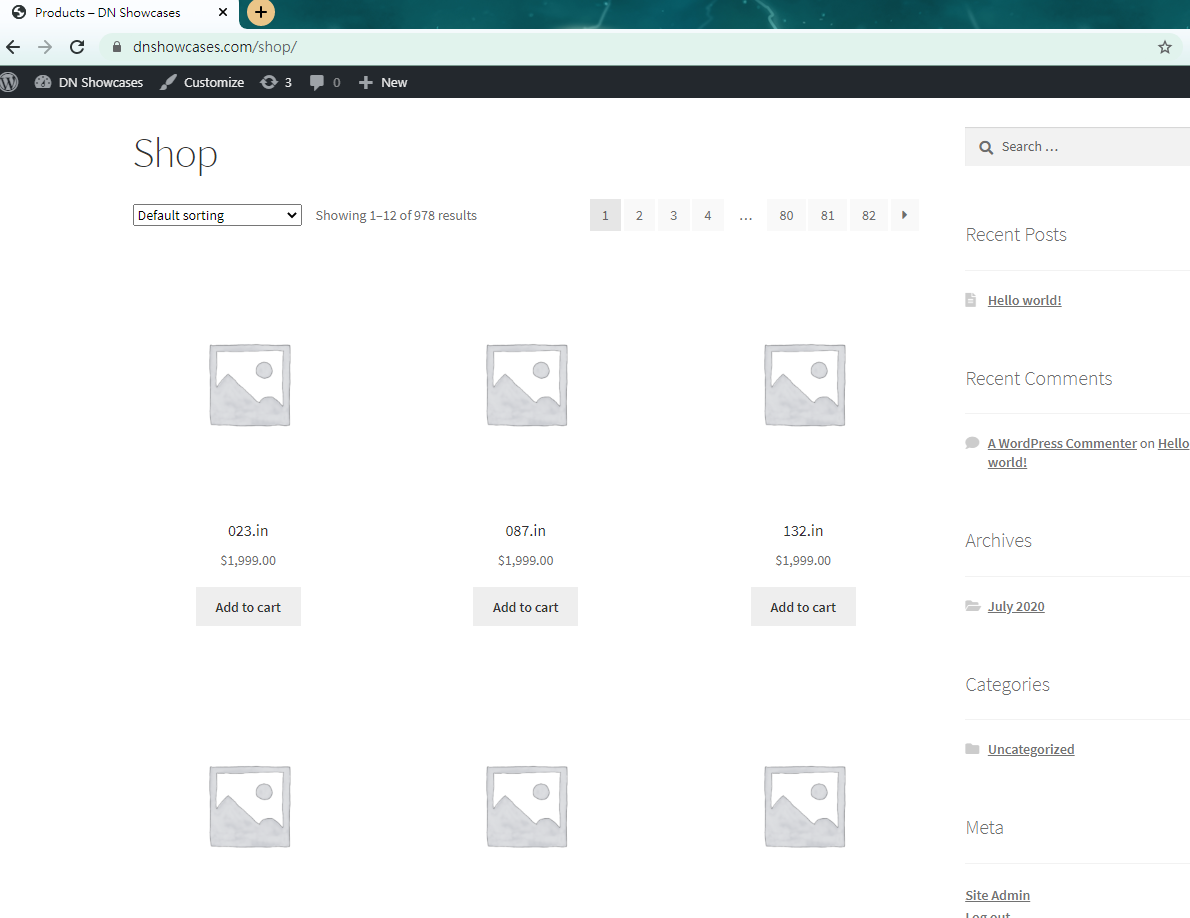
978 Domains are imported. Really Simple !
Your Store Front with WooCommerce (Default Theme)
Product Page (A paid theme)
So, what are you waiting for?
Save your valuable time and get the right tool to do the job right.
This website uses cookies to improve your experience. We'll assume you're ok with this, but you can opt-out if you wish. Cookie settingsACCEPT
Privacy & Cookies Policy
Privacy Overview
This website uses cookies to improve your experience while you navigate through the website. Out of these cookies, the cookies that are categorized as necessary are stored on your browser as they are essential for the working of basic functionalities of the website. We also use third-party cookies that help us analyze and understand how you use this website. These cookies will be stored in your browser only with your consent. You also have the option to opt-out of these cookies. But opting out of some of these cookies may have an effect on your browsing experience.
Necessary cookies are absolutely essential for the website to function properly. This category only includes cookies that ensures basic functionalities and security features of the website. These cookies do not store any personal information.
Any cookies that may not be particularly necessary for the website to function and is used specifically to collect user personal data via analytics, ads, other embedded contents are termed as non-necessary cookies. It is mandatory to procure user consent prior to running these cookies on your website.
![How to Use SyncNames with Sedo [Guide]](https://domainsoftwares.com/wp-content/uploads/2020/07/SyncNames-for-Domain-Professional-Seller.png "How to Use SyncNames with Sedo [Guide]")
![How To Use Cloudflare API Console with Cloudflare API Token [Guide]](https://domainsoftwares.com/wp-content/uploads/2021/07/Cloudflare-API-Console-For-Page-Rules.png "How To Use Cloudflare API Console with Cloudflare API Token [Guide]")


![How To Use Cloudflare API Console – Bulk Change DNS [Guide]](https://domainsoftwares.com/wp-content/uploads/2021/01/Cloudflare-API-Console-For-Bulk-Add-Domains-and-Bulk-Edit-DNS-Records.png "How To Use Cloudflare API Console – Bulk Change DNS [Guide]")